Follow The Beginning Farmer's Wife on Facebook for additional personal peeks at building a family farm.

(Be sure to click both the Facebook "like" and "follow" buttons to not miss any posts.)

Showing posts with label Finances. Show all posts

Tuesday, March 25, 2014

Gardening To Feed a Family

If you have been following my blog long, or if you have read my series of post on Beginning Pressure Canning, you might have picked up that I do a bit of gardening and canning.

As shown by my garden in 2007, gardening was once something that I considered a hobby, something that I enjoyed doing in my free time and something that I could stop if I wanted to (although I would miss it).

Now, however, gardening has become more of a job, something that still has to be done when there are lists of other things calling my name as well. 

The transition from gardening being a hobby to being more like a job has come with the opportunity to help provide for our family, which is now considerably bigger and hungrier than when gardening was just a hobby.  By growing and preserving as much of our food as I am able, I can help decrease the amount of money that Ethan needs to earn off of the farm while continuing to stay at home to raise our children and support Ethan.


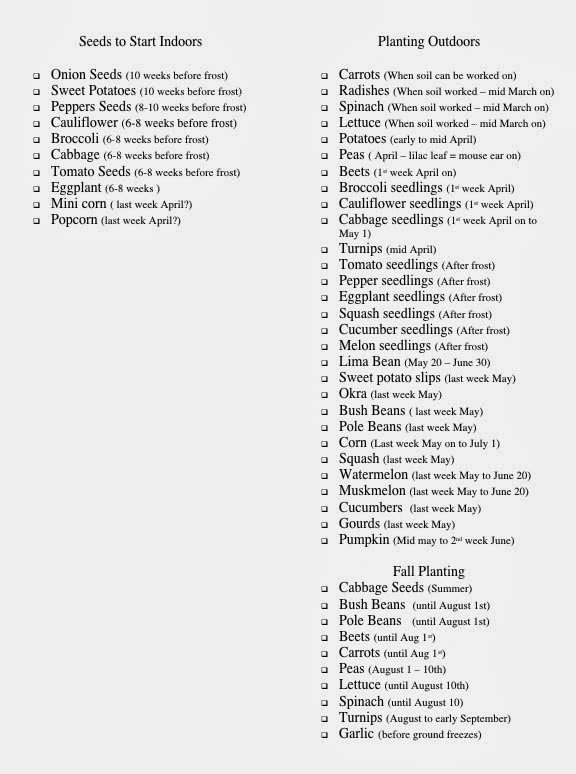
I have had many people interested in the details of the garden I grew last year, which has finally become established enough to feed a family of 6 throughout the year. Because of this, I am sharing with you my garden plans for 2014, which are quite similar to last year's garden.

My drawings aren't super detailed, but I have included the dimensions of each area so that you can get an idea of how long each row is, as well as a guesstimate on row spacing. You may need to click on the drawings to enlarge them (you can open up a new window to do this as you read along), and free to shoot me any questions if you would like clarification on anything. :)

Garden Overview

My garden is made up of a variety of areas with perennial plantings as well as areas for rotational plantings of annuals.  These areas have been set up to provide for the food that our family enjoys.

This first picture, although not to scale, is a drawing of my garden area, which meets up with my orchard. My orchard and garden have been completely fenced in to keep livestock . . . err . . . pests, out of the garden. (I hope to post more about my orchard at a later time.)

Dividing my garden from my orchard is a long asparagus patch which was started from seed.  This is a perennial planting so it doesn't get tilled, although I do till alongside the asparagus on the orchard side to keep the grass from growing into the garden.  This also makes for a nice dust bath area when we have poultry in the orchard. (The chickens are kept out the garden with a temporary fence between the orchard and garden since they will destroy the mulch and tomatoes.  The guinea fowl, on the other hand, are more than welcome in the garden.  They not only leave the produce and mulch alone, but they ravage insects and pests.)

Below the asparagus is where I have my 4 quadrants which are rotated yearly for disease control and to avoid nutrient depletion. (I will describe each of these quadrants more in depth below.) To the right of my quadrants, there is a 5th quadrant (can I say this??).  It is the width of my other 4 quadrants, although a bit longer, and it is a permanent area for my blueberries and grapes.  I have decided to have them in my garden area to keep them within the safety of my fencing and away from the shade of my fruit trees.

At the very front of my garden is a hydrant positioned in the mid-line of my 2nd and 3rd quadrants.  On either side of this hydrant is an area for melons and one for strawberries. These are rotated on a 3 year basis to avoid nematodes in my strawberries. The melon patch gets tilled yearly, and the strawberry patch gets tilled every three years.

Directly above the strawberry/melon area is a length of green and red rhubarb.  These plants are also perennial plants, so this area doesn't get tilled, but it makes a wonderful dividing line between the area I rotate yearly and the area I rotate on a 3 year rotation.

Along the west fence (this picture is oriented as a compass would be), on the inside of my garden, I plant extra peas.  Along the south edge, on the inside of my garden, I plant herbs and greens.

I also plant a border of annual flowers completely around my garden and orchard along the outside of the fence. These flowers, which we save the seeds from for the following year) serve many purposes, and I'm not sure yet which is most important to me. My main purpose was to have a planting that would stop grasses and weeds from growing under the fence (which would be a nightmare to clean without a spray) and into the garden.  Annual flowers are dense enough to prevent weed growth, and they can also be tilled up every year to keep that strip free of any weeds that do sneak in.  This is also a wonderful way to bring in flowers that encourage pollinators, attract predatory insects for garden pests, and that serve as traps crops for those garden pests as well. Not only that, I have let my kids each have a section of fence to plant, tend to, and pick from, giving them some ownership of the garden.  And the fence line is just plain beautiful as the garden welcomes people to our farm and relaxes me outside my kitchen sink window. (We don't have a dishwasher, so I spend many hours at that window!)

Quadrant 1

This year quadrant 1 is my sweet corn patch. If we didn't have livestock that terrorized sweet corn, this would be a much bigger patch somewhere else, and I would rearrange my quadrants.  But, I work with what I have. This year I am planting my successive plantings in quadrants within the quadrants, rather than in rows.  I had some pollination troubles last year by only planting 2 rows at a time. I'm pretty sure that planting my corn in blocks will help solve this.

Within my corn, I plan on planting pumpkins and squash every other row as I have done in past years.  The large leaves help keep the weeds down within the rows, but you will want a nice walking row every other row since the leaves and vines get dense and prickly.  When a plant starts growing into a walking row, I just twist it back to a growing row. Pumpkins and squash have traditionally been grown in sweet corn patches to keep out racoons who don't like the prickly plants either.  I have not yet had a raccoon problem in my sweet corn, although that could be attributed partially to the fence, but more likely to our great pyrenese dogs.

I have also planted pole beans within my corn some years, another common companion to corn, but I much prefer picking and eating bush beans so I probably won't plant these this year. Although not on my sheet, I will probably try to sneak in a row or two of some purple snap beans along the outside of the corn for fun.

Quadrant 2

This year quadrant 2 will be for my potato and sweet potato planting. This is a pretty straight forward area.  When I harvest a row of potatoes, the row will be tilled up, and I will put in some fall beans. The sweet potatoes will be pulled out late summer so they will occupy their area the whole growing season.

Quadrant 3

Along the top of quadrant 4 I put a cattle panel for planting some more peas. On the back side of the cattle panel, I plant a row of cucumbers which will use the panel when the peas are through. I will also plant lettuce between my cucumbers, which enjoy the shaded side of the cattle panel, thanks to the vines growing on the panel.

On the front side of the cattle panel I have an area for broccoli and cauliflower.  I might add a couple cabbage here as well. Between these plants and the peas, I will try to grow a few more melons, allowing them to vine between my broccoli, cauliflower, and cabbage, although I'm not sure if they will appreciate the shade of these plants.  We'll see.

The main part of this quadrant is reserved for my green and yellow beans, of which I can many of. To be honest with you, the main reason I grow yellow beans is because my Grandpa Kies did and they look pretty canned up with the green beans. Otherwise, those rows would be green beans as well.

Dividing my green and yellow beans is a row of eggplant. Eggplant are supposed to benefit by being planted between beans, but this is as much effort as I'm willing to put into eggplant.  I don't eat a lot of them fresh, but they do get dehydrated to be added to dishes (or half of the dish for Ethan's sake) during the winter.

Quadrant 4

Last but not least, is quadrant 4.  Tomatoes seem to take up most of this quadrant, but there is much more going on in here than tomatoes.

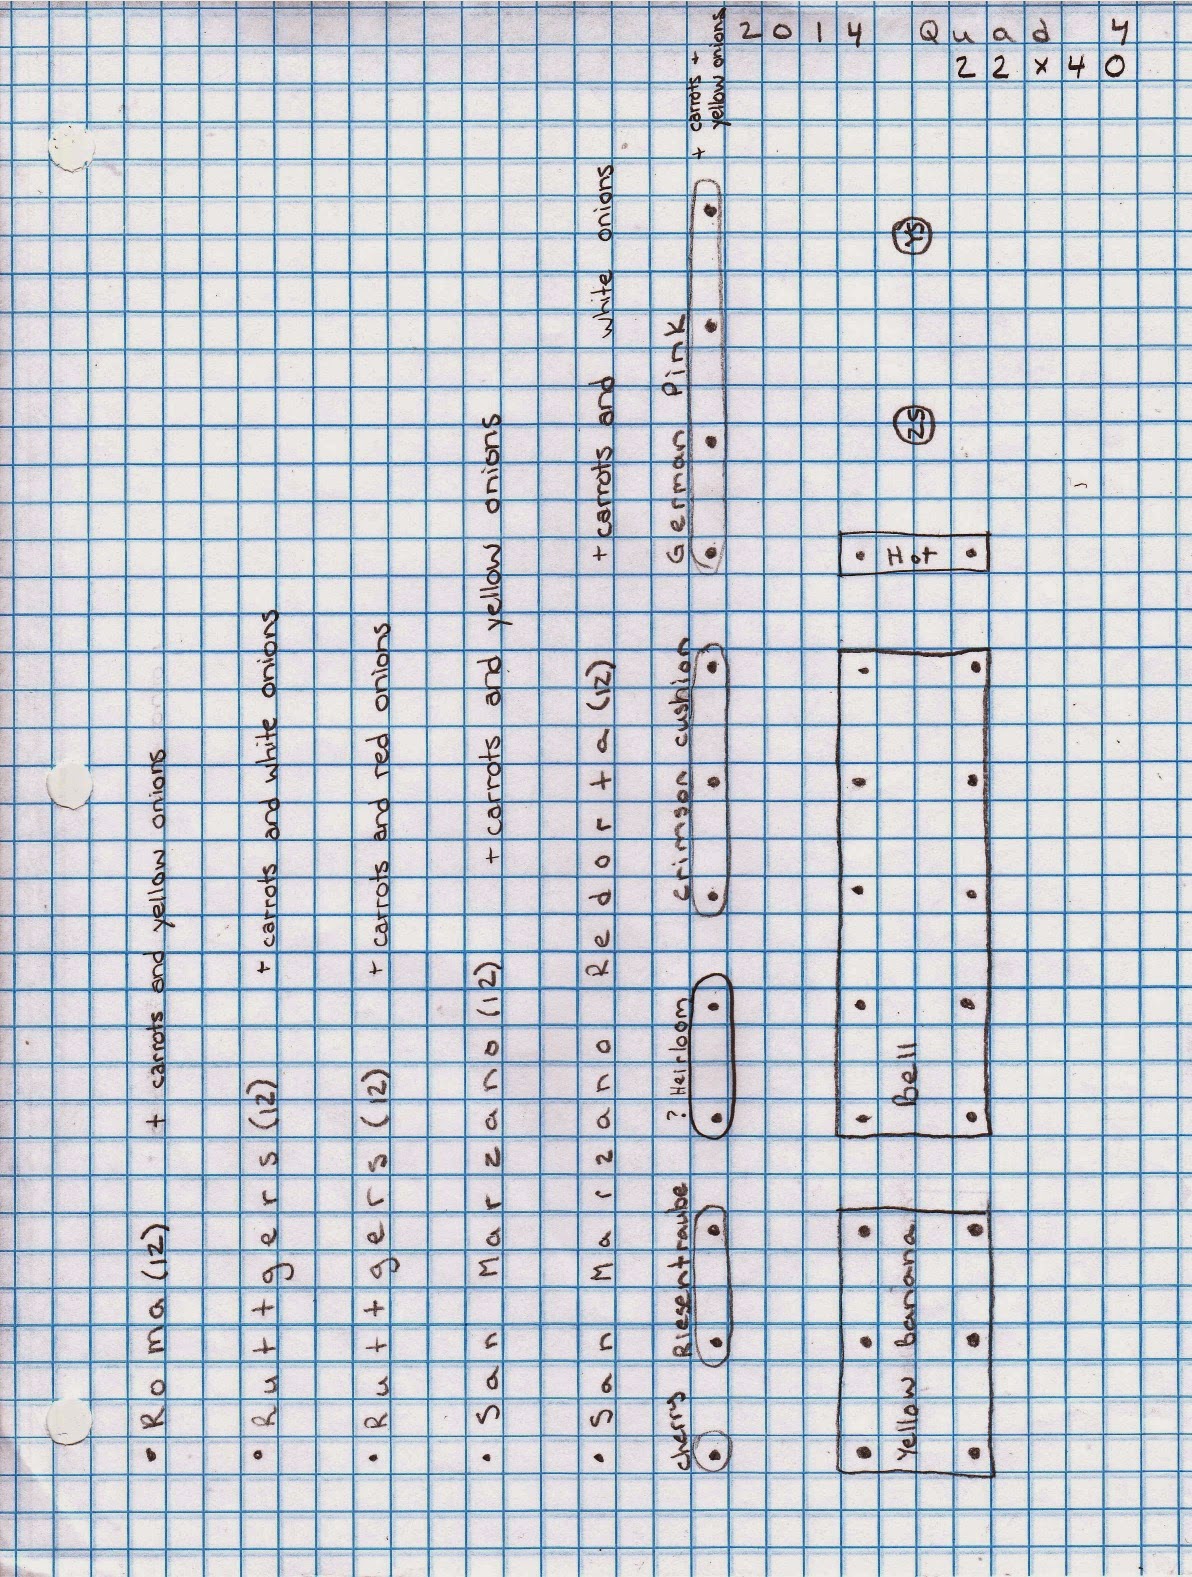
This year I am planting 72 tomato plants which will produce just about the right amount of tomatoes for much fresh eating and canning for our family of 6, if the growing season cooperates.  I have planned their rows according to height (except my last row) and sun exposure, with the tallest plants being planted east, to avoid shading out of smaller growing plants. When I plant my rows of tomatoes, I put a t-fence post on either end of the row and one in the middle.  Up and down these posts I stretch fencing wire, and I tie and train my tomatoes on these wires as they tomatoes grow.

It has taken me a decent amount of experimenting to come up with a combination of tomato plants to serve our eating and canning needs, but I think that I finally have it!

On the west side are my Roma tomatoes.  These are not my favorite sauce tomatoes, but they do come on earlier than the San Marzanos (my favorite).  Planting these allows me to can some early spaghetti sauce, and they give me a back up if my San Marzanos have troubles. Next are the Ruttgers.  These are an earlier tomato, very prolific, and long lasting.  Much of my tomato juice and stew tomatoes come from these, which will be used as tomato soup, in stews and other soups, and to cook rice or noodles in for extra flavor. After the Ruttgers are my San Marzanos.  I LOVE these tomatoes.  They are smaller, but their sauce qualities make up for their size. They are an amazing sauce tomato with a low water content and great flavor.  They are a bit later, but once they are going they are very prolific. I have found that these are prone to blossom end rot in my garden, more so than the other tomatoes.  (Blossom end rot is caused by calcium fluctuations brought about by inconsistent watering. Last year, however, when many were battling blossom end rot, not even my San Marzanos had trouble.  I attribute it to a saving my egg shells through the winter, which I crushed and worked into my tomato rows, as well as having a nice layer of mulch around my tomatoes.)  After my San Marzanos, are the San Marzano Redortas.  These tomatoes are completely amazing in their massive size and sauce qualities, although I did struggle with them a bit last year which was my first year of growing them.  The tomato horn worms love these plants more so than the other plants (they like the regular San Marzanos too), some of the plants just didn't take off as well, and they were a bit later than the San Marzanos only giving me a short harvesting season.  The tomatoes I did get impressed me so much though, with one tomato producing enough for almost a pint of sauce, that I am going to give them a try again. I will make sure to give them an extra dose of our rich compost and keep a better eye out for those pesky horn worms. My last row is mainly my fresh eating row, with extras being canned for stew tomatoes or juice.  The cherry and Riesentraube are wonderful little tomatoes to snack on while gardening (for both myself and my kids).  The Crimson Cushion and German Pink had wonderful flavor last year and both earned a repeat spot. (As you might guess, the German Pinks were a huge hit!), and I have a couple spots open to experiment with new varieties, which one day might take over the spots of another.

Around the tomato plants I have a bit of companion planting going on.  Right within my tomato rows, between the tomato plants, is where I plant my onions.  They did very well last year being planted this way. Also, nestled right up alongside the tomatoes and onions are my rows of carrots.  They also did wonderfully last year.

In this quadrant I also have my peppers for salsa, freezing, and pickling. In addition, I have one zuchinni plant and one yellow squash plant, which provide sufficient squash for many breads, soups and meals - either fresh during the summer or grated and dehydrated to be used throughout the winter months.


What Do Groceries Look Like Throughout the Year?

As for feeding our family of 6, including lunch since we homeschool, I budget an average of $35 per week for our food groceries. That gets us 3 gallons of milk, cheese for our pizza night, rice, beans, noodles, oat groats or rolled oats for breakfast, and wheat berries to grind for flour, along with a few other random things. (The oats and wheat berries come in bulk from an Amish store by where I grew up, along with my bulk spices.) 

Last year I canned/dehydrated/froze 522 quarts of food, with 445 quarts coming from our farm. (We had fruits and some extra veggies given to us locally.) We also filled our storm shelter/root cellar with root vegetables, squash, and gifted apples.

I cook almost everything from scratch and don't make a lot of treats or fancy meals, but we eat well from what we have preserved. For our meat, we eat mostly shanks and hocks that I can from our farm, with random other cuts that are end portions or that get packaged funny, which we won't sell. We also enjoy our eggs sporadically when they don't all sell. When they do, we go without. Hopefully we will have a milk cow in the next couple years as I am in the process of training/taming some heifer calves.

As I mentioned, gardening to help feed our family from the farm is comparable to having a job.  Many summer days I would prefer to be hanging out with friends at the lake, sipping lemonade or reading while watching the kids play in the yard, or doing a bit more traveling and visiting.  But my garden is a job that keeps me at home with the kids, and it's a way to support my husband - and for that I am blessed.


Follow The Beginning Farmer's Wife on Facebook for additional personal peeks at building a family farm.

Tools of My Trade
This book has been a wonderful resource to me on companion planting in order to make the most of my garden space and grow foods without the use of chemicals. It details good and bad companions, how various plants work together for increased flavor, productivity, and pest control.  It includes information not only for the vegetable garden, but also for companion planting with fruits, nut trees, ornamental plants, and much more. Copies of this book can be found used or you can purchase a new copy from the link provided.

Much of what I preserve is pressure canned in order to kill all bacteria in low acid foods that would cause dangerous foodborne illnesses. They can be safely canned by using the recommended times and pressures given for your altitude. I have a couple older Mirro pressure canners given to me that work wonderfully, and my mom has a newer one that she loves as well. If you do some asking around, you might find someone who has given up canning and has one available, or you can look for one like the one pictured below. It should hold around 9 pint jars or 7 quart jars.

Tuesday, March 4, 2014

My Hows and Whens of Starting Vegetable Seeds

Although it is the first of March, I'm having a hard time convincing myself that spring is coming.  Last week temps were hovering around 0 degrees, with a low of -14 one day, and that without wind chill.

Even though spring seems ages away, my seedlings are telling me differently. Last week my tomato seedlings broke through the soil and are soaking in the sun from our South facing window.  The first of my peppers are just starting to peek through too.

I have tried starting my seedlings many different ways over the years.  Time, space, and lighting have always been a challenge to work with, which has led me to trying so many different methods.

I think the first year I tried starting my seeds, I just cut off the bottoms of 4 or so milk jugs, filled them with soil, and planted my seeds.  It wasn't beautiful, but it worked for the few seeds that I wanted to start.

The following year, Ethan bought me a seed starting tray with the expanding soil discs. These were great to use, and the following year I went this route as well.  The only difference was that being my frugal self, I didn't want to buy replacement discs.  Instead, I made my own planting pots out of newspaper and potting soil, detailed in this post that I put together.

My homemade planting pots worked just as well as the store bought. The roots could grow right through them, preventing the young plants from being root bound.  And by planting the seedling with the pot, there wasn't much disturbance to the roots.  The main things to watch for were just making sure the pots didn't dry out (both the store pots and the home pots dry out quickly) and making sure to bury the pot completely when planting to prevent drying out as well.

I used this method for another year or two, but soon I was wanting to start more plants than I had room for with trays.  I was also needing to spend a considerable amount of time making my homemade planting pots for all of the additional seeds I wanted to start.

Because of this, last year I tried something new to me.  I took a 6 inch high rubber maid that I had laying around, filled it with my planting soil, and started rows of plants in my tub. 

I ended up planting them quite close together due to the amount of space I had to work with and seeds I wanted to start.  I planted 2 seeds every inch or so, planning to pinch off the weakest of the two once they got growing. To separate my varieties of plants, I stretched a length of yarn between each row, using a toothpick to hold it in place at each end. 

This worked well enough for me last year that I decided to go this route again this year.

As I did last year, I have my seedlings by our south facing window.  I am again using 2 grow lights that Ethan gifted me (he knows me, huh?!) to keep my plants from becoming spindly from trying to stretch towards more concentrated light. I also have a fan set on low to help develop strong stems on my seedlings, replicating a light breeze outside. In addition, I rotate my container daily so that different sides of the container are right next to the window.

By planting my seedlings in a container like this, the evaporation of the soil is decreased considerably compared to the planting pots that dried out so quickly.  I use my finger along the edge of the container to test the moisture level of the soil, being careful that it doesn't dry out or become too wet, which could lead to problems for the roots.

I have switched from a clear container to a black container, hoping to absorb some of the sunlight and heat coming from the window to aid in germination and growth.  I have marked my rows by writing on a spoon with permanent marker - which I am sure will be much more effective than the tags I taped on the side of the container last year (that would fall off). I have also planted my seeds in blocks instead of rows to make it easier to remove the seedlings that I am wanting to plant, even though I do plan on planting them all pretty much at the same time. (Last year, after I hardened off my plants outside, I used a gardening knife to cut through the soil and remove the plants as I was planting them.  I didn't feel like I caused much root damage, even though the plants were so close together.)

We'll see how this second year of starting seeds this year goes.  If it is like last year, I'm sure I will be quite pleased.

As I wait for spring to arrive, I will prepare a few more smaller tubs to plant in and finish organizing my heirloom seeds, according to the planting guide I put together last winter.  I found this to be very helpful for me after years of fumbling through seed packets, trying to figure out when to plant what, and scratching my head in the garden trying to remember what I finally decided. I only wish I would have made one of these lists sooner!  Feel free to copy it and print it out if you would like, remembering that the dates I have set are for planting times in southern Iowa.


If you are like me, you might be finally brushing off the tiredness from wrapping up the gardening and canning season of last year and feeling a bit of excitement about getting back in the garden this spring.  After this long, cold winter, any thought of spring is exciting!

Follow The Beginning Farmer's Wife on Facebook for additional personal peeks at building a family farm.

Tools of My Trade
Here are a few of the supplies I use for starting my seeds.  They can be found in most home and garden departments or through the affiliate links below.

Monday, November 18, 2013

The Quest for Yard Trees

Way back when, I wanted to go into horticulture, but the Lord led me into the education field instead. (Which I have also grown to love.)  From early on, however, I loved working with plants, dreaming up landscapes, and looking forward to the time when I would have my own property that I could dabble with.  I always thought that this landscaping would be worked around tall, graceful trees on the property, or at least some kind of trees.

7 years into our marriage, the time came for us to purchase our first property. We bought our farm . . . A blank slate . . . Literally.

When we purchased our farm, it was 23 acres of prairie grasses on a hill with a 17 acre woodland bottom.

We built our house on the hill- the bare, treeless hill. 

The wise thing to do when you purchase a treeless piece of land is to plant some trees and get them growing.  After all, trees take time. We were very blessed that first spring to have been gifted an orchard, but much to my disappointment come fall, those were the only trees which had roots in the ground.

Okay, so one year won't make that much of a difference in establishing trees, right? Over the winter I began planning my landscaping layout so I would be ready to go once I could start planting.

The following spring I tried some saplings from our local NRCS spring tree order. The livestock tried those too.  The next year I thought that I should just purchase some taller trees that the livestock couldn't destroy.  After shopping around, I realized that idea would destroy our budget.  Although I did snatch up a couple $7 end of the season close out trees, I never thought that 5 years down the road I would still be dreaming of establishing trees on our property.

So this year, I changed my plan of attack. I managed to find a couple oaks and maples in the woods to dig up and move to the house. Two of them pulled through.  I was also given a gift to purchase some trees, so I placed an order for some smaller trees from the National Arbor Day Foundation and have tried to fence around them well for protection from livestock on the wrong side of the fence.

Even so, we are pretty treeless and a long way off from any sort of shade, as I don't foresee us purchasing any larger trees to plant.  Most likely, our children will probably be taller than the majority of the trees on our property for their growing up years.

The longer we are on the farm, however, the more Ethan and I both realize that this farm might be less for us and more for the generations that follow (if we continue to feel called here, are able to continue on that long, and here is where they wish to be).

So I am now planting my trees with, and for the next generation.

I found a wonderful source of seeds online at the DA Tree Store.  They are very reasonable and have a great selection.  I have ordered seeds for various evergreens from them, many of which will be for a windbreak. The kids and I learned about stratifying seeds (a cold treatment to mimic nature and break down the seed coat to allow the embryo to germinate) and started these seeds both indoors and outdoors this way. 


Last fall we brought home a bucket of walnuts from my parents, dumped them in the garden, covered them with mulch, and waited for spring.  The walnut trees that grew were then moved into various places in our woods, which is pretty void of walnuts.  Hopefully they will take off for the livestock and wildlife to enjoy down the road.


Since our walnut experiment went so well last fall, we have been collecting various nuts throughout the year this year.  The kids have helped me plant hickory seeds, buckeye seeds, various maple and oak seeds. and many other types of seeds and nuts we have collected.  We have even kept back some hardy fruit seeds from our area to stratify inside or start along the fence line of the garden.

To be perfectly honest, I would love to have trees to cast a cooling shade during the hot summer days.  I'd love to have a tree swing to sit on and overlook the pasture, song birds perched close by serenading our family, leaves for the kids to make nests in during the colorful crispness of fall, bare outstretched branches to collect the contrasting flakes of newly fallen snow.

Right now, however, our budget allows for some seeds. Some purchased, most collected. So I am trading my dream of tall, graceful trees for our family to enjoy for a dream of trees for the next generation to enjoy.

While doing this though, I am gaining.  I have gained precious and enjoyable times with our children as we have gone through the summer collecting seeds at the zoo, on walks with grandparents, visiting my home church, friends houses, parks . . .


Each of these nuts and seeds holds a story, and each of them are carefully marked as they are placed in the ground by little hands that are learning. Learning about stratification, learning about transplanting home grown saplings, learning about nuts and seed identification . . . about time together, about patience, and about investing in the future of others.

Follow The Beginning Farmer's Wife on Facebook for additional personal peeks at building a family farm.

Tools of My Trade
This is a great resource with wonderful illustrations.  If you are interested in starting your own plants with seeds, divisions, cuttings, layering, grafting, cultures, or more, this will be your go to book. When I first started propagating plants, I found much of my information on the internet.  I got a good start this way, but having this book on hand helped fill in the gaps for me.  Copies of this book can be found used or you can purchase a new copy from the link provided.

Tuesday, August 12, 2008

Closing Day for our Construction Loan

Today was the closing day for our construction loan! Finally!! After at least 5 different investors have worked through their vacations, illnesses, and paperwork, we now will have money to build!!

I think I know what you are thinking. "Ummm . . . You have been building. Where did you get that money?"

Before I answer that, let me give you a little background on our finances.

Early on in our marriage, Ethan and I learned the difference between needs and wants and how to scrimp and save. (Even though I'm sure we have much more we can learn.) The first year we were married I was finishing college and Ethan was a youth director in a small town church. After I completed my last year of college, we both went to work at Cono Christian boarding school.

The first year we worked at Cono I earned $6500 for the year. Ethan's salary was less than $9000. And that's before taxes. The second year we each got a slight pay raise. So we really didn't have a lot of cash to do as we pleased with, and we learned even more how to save money.

Granted, we didn't have to pay housing. We got to share a house on campus with 6-8 high school boys. We also didn't have to buy our food. We were free to . . . errrr . . . required to eat all of our meals in the dining center. So right there we learned that we didn't need to have an extravagant house or eat extravagant food.

Also, since we needed to be on campus 24/7 during the school year, we learned how to entertain ourselves without spending money. One of our favorite things to do was to go shoot guns across the road by the sewage lagoon in the field. (See what I mean by nothing extravagant!) Also, the only time we really ate out was when I was expecting Caleb, and we got to leave campus for my appointments.

As for the summers there, the first summer we were moving in and the third we were moving out - so not much time to run around spending money in the summers either. And for the summer in between, we re-shingled my parent's house and garage, resided the house, and helped them get started on their addition.

After we moved from Cono, Ethan took another youth director position, and I became a stay at home mom. Ethan's salary increased a bit from what he made at the boarding school, but since my salary disappeared when I became a stay at home mom, things pretty much evened out. So we continued to find ways to cut expenses and stretch the penny.

We knew from the beginning of our marriage that if we wanted to move out to the country we would have to save hard. So that is what we have been doing the last 7 years. We also knew that we would probably never be able to afford big loan payments, so we saved until we could have some cushion and flexibility to help keep our loan payments low.

Which brings me back to the question. Where did our building money so far come without our construction loan? Well . . . we have been spending the cushion we have saved up the last 7 years, and we have never been so broke in our marriage before! I have been carefully monitoring our budget though and keeping in contact with the lenders. Now that the loan is here, we will turn in our bills to be reimbursed for what we have spent and continue with the project.

We are so thankful that we were able to have that cushion when we started this project. If we didn't we would JUST be calling our builder to let him know we were ready for the building to go up - and we probably wouldn't have been able to start work inside until November. We never imagined that it would take over than 3 months for our loan to close. (Not including the 2 months of talking to the lender prior to submitting our information.) So although the 7 years of saving up seemed like it would never end, it has definitely helped out.

Follow The Beginning Farmer's Wife on Facebook for additional personal peeks at building a family farm.


 Tools of My Trade
This kit is one we have used and is worth every penny you will spend on it! Even if you have a good grip on your finances, there will be things you can take away from this study that will be a blessing to you.  As Mr. Ramsey says in his radio show when it comes to figuring out how big of a mortgage you should take out on a house, "You want your house to be a blessing, not a curse."  I believe that this advice fits with all purchase that are made.  In addition to not having them be a curse by needing to make payments, we also need to keep them from becoming curses down the road by using up money that could have instead been set away for emergencies or more important purchases.  This plan helps you figure out how to budget your money in a way that you will move more and more from finances becoming a curse in your life to more and more of them becoming a blessing.

 
If you just want a very helpful, but not as in depth version of Mr. Ramsey's financial advice, the Total Money Makeover is another wonderful resource. We have a large number of friends who have used this book to help turn their finances around. You may be able to find a used copy of the book through e-bay or half.com. You can also pick up a new copy from the link below.

Monday, October 22, 2007

A Challenge For You . . .

Ethan and I are getting to the point where we would like to take a step and move from our house in town to a spot in the country. The last couple of years we have been watching the housing market in the area and crunching numbers. We have figured out that at best, we can afford a place that has has a nice amount of land but a small house or a place with not very much land but a little larger house. We haven't really seen anything come around in our price range with a nice amount of land and a large house.

So the question that has been bouncing around is how much land will we need to do some farming and what size of house will we want for comfortable living. Right now I feel like we are outgrowing the house we are in. We have 3 tiny bedrooms (one is serving as an office, one is our bedroom, and one is for Caleb and Hannah), a small living room/dining room area that has room for 2 chairs, a couch, and our table, and then the kitchen and bathroom of course. There is no garage, but there is a dungeon basement only used for storage although I really don't like to use it for that since mold grows well down there.

I have come to realize, however, that maybe the reason we feel like we are outgrowing our house is not so much because of us, but because of our stuff. Just so you know, I am far from a pack rat. I have often been accused of not having enough stuff and the house looking bare, yet the closets continue to fill to the brim with tubs of things to be stored.

With Christmas coming up, I am getting a bit worried about the inflow of gifts from gracious givers and how we will be able to work our new gifts into our house. So I am starting a project that seems to happen every year. I guess you could say I am rampaging through the house. During this time I purge the house of anything I can give away, throw away, or sell in order to make more room in our house for the boxes of new things that will appear come December.

So here is my challenge to you . . . a declutter challenge. To get started, just think about the older farm families (like my dad's) who lived in a 3 bedroom house with 11 kids and no basement. Consider the cost of all of that stuff that you really don't need - the stuff that takes up precious space causing so many people to think they need bigger houses and garages when really they just need less stuff. Think about the time wasted juggling worthless stuff around. Then think about what you can give away, throw away, or sell (we love e-bay!).

Here are the rules:

Set up three boxes/bags/containers in an out of the way spot. Label them give, throw, and sell. (Throw away things do not include day to day trash. It is things that you have actually been storing that can be thrown away.) Until Christmas, whenever you come across anything that fits in one of those categories, put it in it's appropriate container. Keep your eyes open as you walk around and every time you open a closet, drawer, or box. If you have time, start digging through storage areas too.

Here are some questions you can ask yourself that will help you find things to sort out of your house:


  • Would getting rid of this be more beneficial to me than keeping it? (Rather than selling it, is it tying up money that I need or could use elsewhere or is it taking up too much of my time shuffling it/dusting it?)
  • Was I surprised to see it or realize I had it?
  • Have I used it in the last year, or do I have specific plans to use it again? (Preferably within the next year, but there are exceptions.)
  • Can this be replaced easily for close to the amount I can sell it for or for very little if I give or throw it away?
  • Would this be more of a blessing to someone else than it is to me?

    Once you get going, do not look in the containers after you start putting things in them. In other words, don't second guess yourself. If you put it in, leave it in. After just a little while of doing this, I think you will be amazed at the sheer volume of stuff that you actually have in your house that you do not really need. I am every time I do this, and I do it at least once a year. I will warn you, however, that you might find many things that you have boughten and realize that maybe you shouldn't have. If they fall under the "clutter" category, still get rid of them even if it means you wasted money. I guarantee that if you do this activity often enough and after you toss enough of those kind of things, you will start to become wiser in how you spend your money.

    I will try to remember to post around Christmas time and let you know how much stuff I came up with, hopefully having a picture to show too. I would love it if you join me in the challenge and drop comments on how your boxes/bags/containers are filling up.

    My whole reason for doing this is to keep our house from being overcrowded with stuff that we don't need, and hopefully when the time comes for us to buy a place to do some farming in the country we will be able to look for a house to fit needs according to our family and not according to our stuff.

    (authors note: To see my results, click here.)

    Follow The Beginning Farmer's Wife on Facebook for additional personal peeks at building a family farm.

  •  Tools of My Trade
    This kit is one we have used and is worth every penny you will spend on it! Even if you have a good grip on your finances, there will be things you can take away from this study that will be a blessing to you.  As Mr. Ramsey says in his radio show when it comes to figuring out how big of a mortgage you should take out on a house, "You want your house to be a blessing, not a curse."  I believe that this advice fits with all purchase that are made.  In addition to not having them be a curse by needing to make payments, we also need to keep them from becoming curses down the road by using up money that could have instead been set away for emergencies or more important purchases.  This plan helps you figure out how to budget your money in a way that you will move more and more from finances becoming a curse in your life to more and more of them becoming a blessing.

    If you just want a very helpful, but not as in depth version of Mr. Ramsey's financial advice, the Total Money Makeover is another wonderful resource. We have a large number of friends who have used this book to help turn their finances around. You may be able to find a used copy of the book through e-bay or half.com. You can also pick up a new copy from the link below.
    Related Posts Plugin for WordPress, Blogger...