Follow The Beginning Farmer's Wife on Facebook for additional personal peeks at building a family farm.

(Be sure to click both the Facebook "like" and "follow" buttons to not miss any posts.)

Showing posts with label Housekeeping. Show all posts

Friday, February 27, 2015

The Thrill of Laundry

Cooking, dishes, cleaning, teaching (if you home school), laundry . . . these things can pretty much consume your days. And unless you are a lot better story teller than I am, the stories of the day are not so interesting.

Don't get me wrong, I am incredibly blessed to have the job I do, but sometimes I feel like if I really shared my days with people, I would end up looking into a lot of bored faces.

But they ARE my days. 

And sometimes, even when you feel like what you have to share is incredibly boring, you still just want to share.

So at the risk of boring my readers, I am going to share how we do laundry around our house. (Okay, so I wrote this post last year, and am now just risking boring everyone!)

And at the risk of inviting comments and receiving none, I'd love to here how you do your laundry at your house. :)

I try to teach my kids to do as many "family jobs" around the house as they are able.  From the time they are young, they are required to sort their own laundry into the appropriate laundry baskets.  Before they are able to read, they know what each of the color coded tags mean on each basket, although I still do write the words. (I think it helps Ethan!)
 I used to try to do 2 loads of laundry a day, but I was often discouraged about the non-stop piles of laundry cycling through the house that needed to be dried or put away.

Now, I attempt (*attempt*) to have all of my laundry done in 2 days - 3 if it takes a bit to dry.
Mondays, are my wash day.  Since I have 7 loads that I do and only 4 laundry hampers, there is a small bit of sorting, but the majority has been done already throughout the week.  My youngest enjoys tossing the last sorting of clothes into the washing machine with me.

Throughout the day, I have a number of laundry baskets that clothes get dropped into straight out of the washer.  In the summer, I would go outside and hang up clothes on the line right after I threw the next load into the washer.  In the winter, however, the wet clothes accumulate in baskets until evening. After supper, it's go time.

I have 2 closet poles that come out of the laundry room that get stretched between our dining room chairs. While I am setting this up, my kids are sent on a hanger hunt to collect all of the hangers from their closets.

 We then turn on Pandora and have a little race.  The kids have 5 songs to get their clothes that are hung in their closets put on hangers, their clothes that go in dressers in one laundry basket, and socks and wash clothes in a second laundry basket.  Nothing really happens if they don't beat the song, but they enjoy the challenge - and it helps keep them focused.

 While they are working, I am also working along beside them.  I hang up Ethan and my shirts, hang all of the dresser clothes on our 2 taller-than-me Amish made drying racks which my mom gifted me (from the settlement in Hazelton close to where I grew up), and finally throw the socks and wash clothes into the drier.  Why do I only dry the socks and wash cloths?  Dryers are expensive to run!
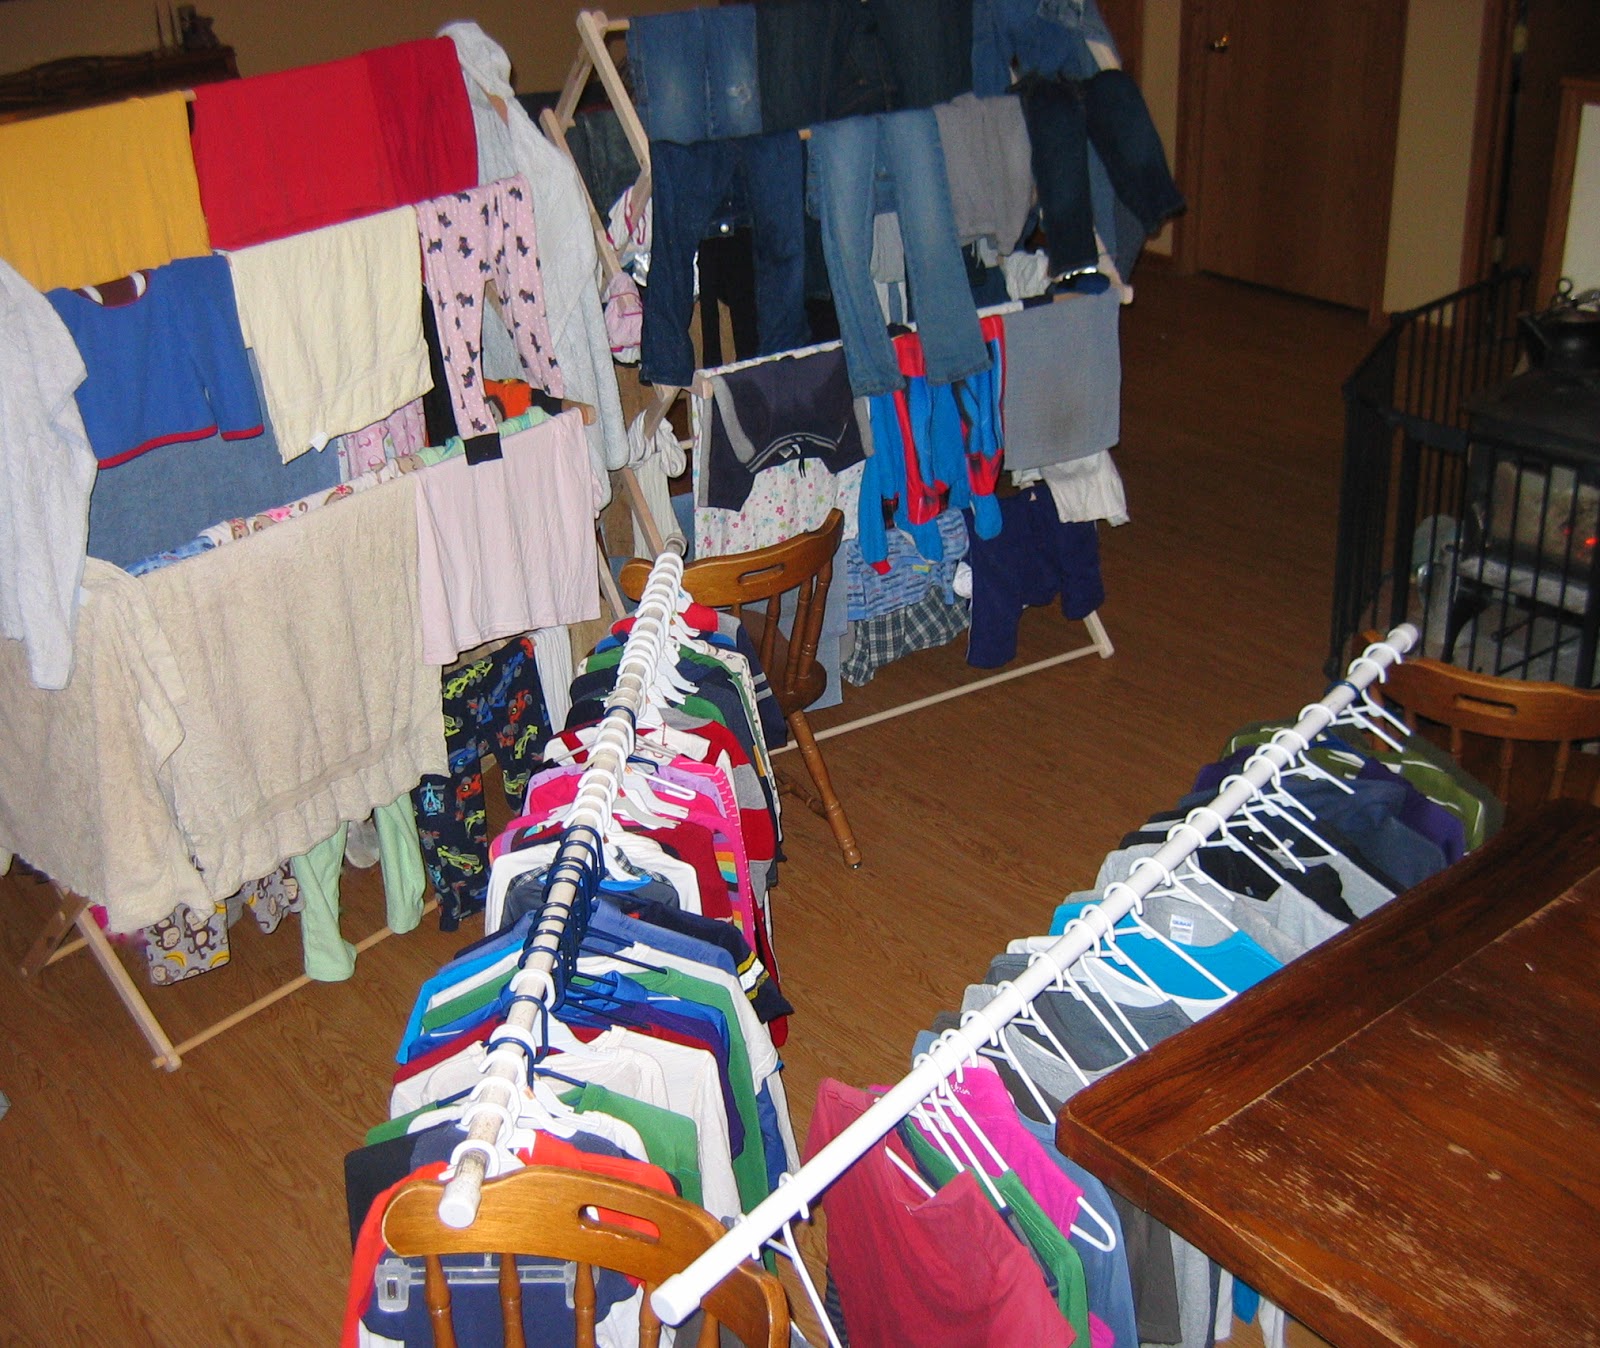
When we are done, this is what the area between the living room and kitchen looks like. (Can you see why I might enjoy summertime when clothes can be hung outside?) 

 
Our wood stove, which is right by my drying area, is fired up with its drying heat, the 2 steam pots which supply our house extra humidity are removed from the wood stove, and the ceiling fans are turned on for the night.

When morning comes, I will pull off all of the dry clothes from the drying rack and rearrange the wet clothes on to one rack, letting me put one of the monstrosities away.  The shirts on hangers (which are usually still slightly damp) are taken into the laundry room to be hung in designated spots for each person until they finish drying.

Once Tuesday evening rolls around, its time to put laundry away. Pandora is set to 5 more songs, and the sorting begins. 

The dryer is emptied of socks and wash cloths, and the kids start sock sorting.  Everyone has their own sock spot which the kids deliver socks to, as well as match up matches. Caleb and Hannah each have a bookshelf, Ethan has the couch, I have a blue chair and Isaac and Jonathan share the piano.

 As they sort socks, I cycle around behind them and fold socks together. We also make a little race of this.  I try to get all of the socks folded that are matched up before they get done, and they try to keep ahead of me. I have attempted to let them fold their socks together, but I have found that just leads to me sifting through dressers picking out socks that have came apart and are floating around.  Maybe when they are older . . . 


All of the laundry from the drying racks is also dumped out and folded.  As it is folded, it is stacked on the back of the couch.  Each of the kids has their spot on the couch where their folded clothes go.  (Ethan and I have a spot on chairs and the towels on a bench.) When these spots are full, Caleb puts his clothes away and helps Isaac with his, and Hannah does the same with hers and Jonathan's.

Along with the clothes folding, is the diaper and wash cloth folding. (Okay, if you count the diapers and work wash clothes, there are 9 loads of laundry/week.) Isaac and even Jonathan (5 yrs old and just turned 3 yrs when this picture was taken) are pros at this job.  As the wash clothes and diapers are folded, they are loaded up into a laundry basket to be carried to the bathroom and put away.

And not to be forgotten are those shirts.  I usually leave them hanging in the laundry room one more night, but bright and early Wednesdsay morning they are placed on the kids' spots on the couch, to be whisked away into closets when they wake up.

And just like that, we are done with laundry until the next Monday morning.  5 beautiful laundry free days. 

On a good week.

For some odd reason, I kind of enjoy hearing about how my friends do their laundry.  Maybe it's because I find it facinating how each family has a different rhythm to making laundry work in their family . . . or maybe it's just in hopes that my life isn't that boring itself and someone enjoys hearing how I do laundry. 

Either way, I'd love to have you share your laundry routine!

Follow The Beginning Farmer's Wife on Facebook for additional personal peeks at building a family farm.

Tools of My Trade


This folding drying rack is similar to the drying racks that were made by the Amish area where I grew up.  They are wonderful for hanging multiple loads of laundry, sheets, towels, jeans, etc.  Not only are they very sturdy, but they also allow for good air flow. I couldn't not use my dryer without one!

Although it isn't as heavy duty as some, this laundry hamper has served me well for the last 10 plus years. I also like the mesh bags which allow you to see in and allow any damp or soiled laundry to breathe.

Tuesday, February 18, 2014

Our Maxed Out Mudroom

I am taking a short break from my series of posts on Beginning Pressure Canning to give you a chance to gather your materials I shared about in Understanding Pressure Canning and to do some trial runs as described in my photo tutorial on The Pressure Canning Process.

During this little break, I'll give you a quick glance around the rest of our mudroom.

When I decided how I wanted to finish off our mudroom, I decided that I wanted it to look like the outside of the house to give the feel that you hadn't quite entered the house.  After all, it was going to house all of our farm gear, which I was assuming would be quite dirty.  I was right. Hence the name mudroom. So please excuse the mud. :)

If you read my post on Managing Mittens in the Mudroom a few weeks ago, you read all about my struggles to organize our children's hats, mittens, and gloves, as well as seeing what I eventually came up with.

Well, the rest of the mudroom has been about as equal as a struggle as the mittens.  We are finally getting to a point where we can function in there though.  I'll walk you around, show what all we have going on in here, and share more than you would probably ever need to know about a person's mudroom

First of all, to gain your orientation, the photo above is directly to your left as you step inside our mudroom. There is a window above the mittens, and if you take a few more steps forward, you will find yourself walking into our house.  We won't go in the house today. If you turn your head from the left to the right, you will see the rest of the room.

Along the outside wall of our mudroom is where I attempt to organize the rest of our farm gear.

Next to the light switch is fun little chicken key holder that my parents found for me on one of their flea market excursions.  It not just holds our keys, but it also is a handy spot for Ethan's headlamp, which gets used quite often considering many of his chores are done during the dark hours of the day, when he isn't in the office or at the other farm he works for.  The wind chime partially shown above was a wedding present from Ethan's grandma and gently chimes when a summer breeze blows through the mudroom window.

Hanging on a nail in the wall beside this, is our electric fence remote, quick to grab and handy to use!

You will also notice across the top of the area shown is an array of Amish style farm hats.  My parents live by an Amish settlement, and when we were dreaming of farming, I bought the family some of these for Christmas.  My parents have picked up more sizes since we moved to the farm so the kids would have shade to wear on our treeless (shadeless) hill. 

Also, hanging on the wall are mostly Ethan and my farm coats. Yes, we have a lot of them. Just like you have the right shoes for the right occasions, we have the right farm coats for the right occasions. When you are out doing chores or working on a project for an extended amount of time, you want to be dressed right, especially in the winter.  Not too cold, but not overheating.  Thankfully, many of these coats get put away when the summer warms up.

Under the coats is my shoe shelving. Like my mittens, in another moment of mudroom desperation, I constructed our shelving by again wandering around to see what I could find. I ended up grabbing two empty milk crates and a couple loose boards to set across the top.  This year, as little feet have gotten bigger, I decided that I needed another level.  I was able to find one more board, as well as some bricks.

Ethan and my shoes and boots go underneath, and the kids' shoes go on the shelves. Like the gloves, my kids have learned that they need to be responsible for their shoes as I remind them that not picking them up is like telling me I need to.  As you can see, most of the shoes are fairly well matched. It's not beautiful, but it does the job.  I'm thinking that one of these years, as soon as I finally get everything situated to where I want it, I might ask my dad, who builds custom furniture, to build for me the shoe shelf that I have drawn up in my head.

Past our shoes and coats is a wooden locker that I picked up for free when our town's head start was moving.  My mother-in-law helped me paint it, and after hanging hooks inside, it became our kids' storage area. This is where they hang their farm coats and snow pants, as well as where they keep their boots.  We used to keep the gloves and hats in the little cubby above, which was disastrous.  Now that area is used to keep sunglasses, the tool belts that I made for them, and any other extras that need a place.

On the far end of the locker, on the far, far side of the mudroom, is a hook to hang (hide) our farm coveralls.

On top of this unit, from the far right to left, is a basket for Ethan and my gloves and hats, a tool carrier for tools Ethan wants to have handy, another basket for farm outdoor odds and ends, and also a tool carrier for myself.  This tool carrier got put on my Christmas list this past year after trying to hunt down Ethan's tools for projects that I try to work on when he is gone or for home repairs that I attempt - every farm wife needs one of these! (Plus, her own tools!)

Now to the opposite side of the mudroom.

Right as you walk in, you have a mudroom sink that greets you, calling you to wash off all of the farm dirt that was acquired outside. This is also the sink I use to wash up our chicken eggs, and the cabinet underneath makes a great spot to store egg cartons.

Above the sink is a medicine cabinet I recently installed where I keep things like band-aids, sunscreen, and bug deterrent, and hanging on the wall beside the sink is a rooster towel holder, gifted to me one Christmas from Ethan.

Above the towel holder is our little egg basket that I bought Ethan when we still lived in town and were wanting to add some chickens in our backyard.  Although this little basket doesn't quite do the job anymore, it's a great egg basket for small helpers who tag along.

Underneath the towel holder is our ash bucket which I shared about in my post  A Glimpse Around Our Woodstove.  This ash bucket can get quite hot when first filled, which is why it gets set on our cement floor, painted brown to add to the barn-like effect of the room and to try and help hide the dirt - a near impossible task in this room.

Next to the sink is our family freezer.  I was very excited this year to get a freezer back for our family's use since every year prior our freezers have all been used for our business.  Actually, I was excited to get our mudroom back as well. Before we finished our freezer room, which now holds 6 business freezers and our market supplies, our mudroom was the central location for our farmer's market business.  The two freezers, towers of coolers, and marketing paraphernalia did not help the sanity level in the mudroom one bit!
 
Past our home freezer we now have 2 incubators and a hatcher.  I'm thinking these might get a stand built for them so that they can be stacked three high (we have 10 foot ceilings), since we are also wanting to add an egg refrigerator to this room this spring.

For now, we have our egg hatching cabinets in two locations, and atop one of our incubators you will find our real egg collecting baskets, a watering can, and Ethan's batteries for his power drills. The space that will be consumed by the egg fridge makes a handy spot for Ethan's chain saws, used frequently to cut wood for our wood stove.  *Sigh*  I guess we'll need to find a new spot for them . . .

If you were observant, you may have noticed from the photo showing the whole wall of coats and from the photo showing the stack of incubators, there is a curtain along the back wall.  I'm not allowed to tell you what is behind the curtain.  Just kidding.  Actually, there is a small mess behind the curtain.  Stacks of tubs, a coat bar for hanging coats we don't want farm filth on, and an area that will hopefully soon be transformed into shelving for my overflow of canned goods that are now stacked in my hallway. Some day I hope to replace the curtain with some sliding closet doors resembling barn doors . . .  Someday. 


Here is the view from the back end of our mudroom. Because we have 10 foot ceilings, we had to join the wall boards to reach to the ceiling.  The white trim covers the joint, and above the trim I display fun farmy things.  On the left wall are some old traps and a cool seed bag from some open pollinated corn we experimented with one year.  Continuing around is a wall hanging from a foreign exchange student who was in our youth group which depicts a farm in her country, along with a wall hanging of an African Guinea Fowl coincidentally given to the year we got guineas by my Uncle who is a missionary in Zimbabwe. A bit lower, beside the window, you will find Ethan's snow shoes and a pig wall hanging he gifted me one Christmas. And up high again, along the right wall, is a rooster clock positioned to check the time by a quick peek inside the door, two lanterns that we have used for school when our power went out, and a rug beater that is no longer solid enough to beat my rugs but is still pretty.

Like I said, this is probably more than you ever wanted to know about someone's mudroom.  I'd love to hear anyone's tips or tricks they might have to offer since it is still a work in progress. As hard as it is to function within it though, I can't even imagine trying to be able to function without it!

Follow The Beginning Farmer's Wife on Facebook for additional personal peeks at building a family farm. 

Tools of My Trade
 

This tool carrier is the one I ordered with my Christmas/Birthday gift money.  I had been eying Ethan's over the last year as I realized how helpful it would be for me to keep my house and garden tools handy.  It has a generous amount of pockets, and it even has a little box that fits underneath to hold nails, photo hooks, or whatever else I want to store for my building/household projects.  I just wish I would have gotten one sooner!
I do have to admit that although I thought Ethan's headlamp, similar to this one, was a little silly when we first started the farm, I use it quite often too now.  When I'm out in the dark, by myself, trying to get something done as quick as I can to get back inside (yeah, I'm wimpy in that I prefer not to be out in the dark by myself), I appreciate not only light but also 2 hands to work with.

Sunday, February 2, 2014

Managing Mittens in the Mudroom

When we built our house, I was adamant that we have a mudroom.  I did NOT want to deal with the mess of farm dirt being tracked throughout the house so I very strategically planned our mudroom and house entry: a spacious room where the farm clothes could be left, a sink to wash in before entering the house, the bathroom just a step in from the mudroom (for those times when you do need to take a step inside), and the laundry room connected to the bathroom to rid ourselves of the last of the farm dirt on ourselves and our clothes before calling it a day.

There is not much that I would change about this set up.  Still, challenges have abounded in the mud room, and they have grown as our family and farm has grown.

Not only do we have farm boots, farm coats, farm bibs, farm hats, and farm gloves . . . and duplicates of all of those for the different seasons, but we also still have our regular outdoor attire that we prefer not to get far dirt on: town shoes, town coats, snow pants, town hats, and town gloves.

If that wasn't enough, the mudroom also houses tools, equipment, incubators, storage tubs, our home freezer, and soon to be added - storage for the overflow of our home canned goods and a refrigerator to hold more eggs.

Organizing all of this has been quite the task.  Functioning in the mudroom, as we are still in the works of getting it completely set up, has been an even bigger task - especially in the winter when the plethora of hats, gloves, and mittens increases.

After the continuous challenge of finding matching gloves for the kids as well as hats to wear when we were needing to head out the door (and then the gloves, hats, and mittens that constantly littered the floor so that you had to search for your next place to step), I put together an organizing system that I could not do without now.

Last year, in a very desperate moment when my mudroom patience had disappeared, I raided my desk drawer and pulled out some clips, grabbed the nearest used farm twine that I could find (which wasn't that hard to find), knotted the clips on to the twine, pounded some nails into the wall, and hung my glove organizers up.

Since that day, I have replaced my nails with cute white hooks and have replaced the mudroom chaos of hats and gloves with a little more "Mommy calm". 

The kids each have their own little hook under our window now, where they hang their scarf and can clip on their mittens, hats, and work gloves.  When summer comes, the winter gloves will be switched for gardening and summer work gloves, and the hook will be used to hang their favorite outdoor cap. (As you can see, there are two extra hooks that right now are being used for our spotlight and the explorer bags that I made for the kids - both of which get used quiet a bit.)

Each child is responsible for hanging up their own hats and gloves (although the younger two do get some help).  With gentle reminders that leaving gloves on the floor is like telling me I should take care of their messes, they usually do a pretty good job of keeping things together now.

This little system was so simple to throw together, and it is so simple for the kids to use. Not only that, but I have found their hats and gloves dry quicker too.

Like I said, we are still in the process of getting our mudroom set up, but we are slowly getting there. Stay tuned, and I'll show you how I manage the rest of the our mudroom, and feel free to offer any suggestions!


Follow The Beginning Farmer's Wife on Facebook for additional personal peeks at building a family farm.


Tools of My Trade
These are the type of clips that I knotted onto my twine. They are a little tricky for my 5 yr old to do, but he is getting there. You can also find them in different colors to tie on to different colored ribbons, matching your decor.

Sunday, January 26, 2014

Keeping the Fire Burning :: A Glimpse Around our Wood Stove

If you have been following the news, you might have noticed the recent propane shortage. A number of our friends had recently had their LP tanks filled, followed by their wallets emptied.  One of my friends was sharing that the price jumped from $1.65 per gallon to $3.25.  Another friend shared that their monthly bill went from $500/ month to $900/ month at this increase, and the LP company warned that prices might be as high as $5 per gallon by the end of the month.  They have turned their heat down to 60 degrees.

As I sit in my 76 degree house, my heart goes out to the families that are being effected by this shortage, and I realize even more the blessings of wood heat.

For those of you who may be considering heating with wood or are fairly new to using one, I thought I would share a little bit about about what we have acquired around our stove that keeps our fire burning.

Although there is much work that Ethan does cutting our wood, bringing it to the house, and splitting it (which the kids and I enjoy helping with as able), there is some work indoors to keeping a wood stove going, which I usually take care of being the one home.  This work is well worth it though, considering the money we saved not putting in duct work, a furnace, or paying a monthly heating bill.

Plus, it is relaxing to watch and has wonderful heat to soak up - it is a great place to check the kids' school papers in front of or just pause in front of (with often very long pauses!).

I have to admit that getting accustomed to using our wood stove included a bit of a learning curve, but now that we are in our 6th winter burning wood, we have slowly acquired a number of helpful tools so that maintaining a good fire has become pretty common place and routine.

One of the first and most important things that I felt we needed after setting up our wood stove was a way to keep the kids from serious burns.  At the time, we had a 4 year old, just turned 3 year old, and a newborn who would eventually be crawling.  It was very important to me to have some sort of protection around the stove, not only for my little ones, but also for those visiting who might be unfamiliar with wood stoves.  After digging around on the internet a bit, reading reviews, and looking at pricing I found an attractive safety fence that I am still very happy with.

This fence comes in 5 sections, one of which has a gate with a very secure latching system.  There were also optional extension pieces of various sizes (of which we ordered one), that allow you to perfectly fit the gate to the area needed. These sections can be adjusted to any angle, which also allows for getting just the right fit around your stove or fireplace. This fence is also a nice weight and is very sturdy once set up. It came with wall attachments to further help with security, but since I fold it up at the end of each season, I opted not to use these.  Plus, I felt that it was sturdy enough as it was, and without the brackets I can also pull it out for easier cleaning.

You might have noticed from the top photo that we have a black stove board outside of the fence, on the right hand side of the stove.  Although not beautiful, this is in place to deflect heat away from a beautiful roll top desk that my dad, who has a custom woodworking business, built for me.  The stove board gets tossed up in the attic with the fire gate once we are done burning wood for the season.

Also, on the outside of our gate, we keep a crock that contains some valuable items when working with our stove.  This crock holds newspapers and matches for starting new fires (matches can also be kept inside the fence for extra safety with little ones), fire starting bricks for those late night returns when we want fire quickly, a small dustpan and broom for sweeping up pieces of wood, Creo-Shot sticks for cleaning out creosote during the small fires of spring and fall,  and most importantly, fire gloves to not only safeguard when adding and moving logs, but to also make working with hot fires and coals more manageable.

Speaking of hot fires, one of the hardest things when first working with a wood stove is figuring out how to get the right burn within your stove.  This is something that we fumbled with for awhile.  If your fire burns too cool, you will get a creosote build up in your stove pipe, which can in turn lead to a chimney fire that could cause considerable damage to a home.  If you burn your stove too hot, you would avoid the creosote build up but could cause considerable damage to your stove.  Along with that, not burning your wood at the proper temperature means that you don't get the best efficiency out of the wood you have worked so hard to acquire.

In order to help with keeping our burn at the proper temperature, we now have a wonderful little magnetic stove thermometer that sits on the hottest part of our stove. The coil on the underside of the thermometer controls the needle which tells us if the fire is burning at a temperature that produces creosote, is in the best zone, or is too hot. By a quick glance at this thermometer, we can either add wood or dampen the stove accordingly.  This thermometer even has a wire handle, allowing us to move it without getting burnt.

Another item that we have on the top of our stove is a steam pot.  Actually, we now have 2 as I asked for a second one for my birthday.  I keep these steam pots full at all times to keep our air moist (unless I am trying to dry laundry inside and want less humidity in the house). When the burn is kept in the best zone, these pots produce a consistent steam to rehumidify the house. A wood stove does dry out the air quite a bit, and adding humidity back to the air is very important for your skin, as well as your wooden furniture. (As a cautionary note, these pots will spew out boiling water all over if you get your stove too hot. Don't ask me how I know! Although the photo doesn't show it, I usually keep the lid swung open to keep an eye out for water starting to boil, as well as monitoring water level.)

Although not with our stove, this little thermometer/hygrometer that I have attached to our refrigerator on the other side of the room is a great tool to have too. Since I am most comfortable when the house is at 76-80 degrees - while I am also wearing a fleece vest of jacket - I often look at this to make sure that I'm not heating the rest of my family members out of the house.  I can also tell if I've neglected to fill my steam pots by a drop in humidity.

Sitting around the front base of our stove are a few tools that get used quite a bit and have earned their stay under or right next to the stove.  The little tin watering can was purchased for a couple dollars on a trip to IKEA with a dear friend of mine.  It is used to keep the steam pots filled. 

The tool somewhat parallel with the front of the stove, with a shepherd's hook like handle, came with our tool stand and is used for moving logs around within the stove.  The pointed tip is helpful for pushing logs, and the hook is helpful for grabbing at and pulling logs. 

Laying diagonally across that tool is what is called a blow poke.  At one end it has a mouthpiece that you blow into.  The air is focused through the tool and out an opening in the end.  This is a wonderful way to get focused air movement inside the stove to bring coals or weak fires to life, without creating a spray of ashes.  At the end of this tool is a claw, also helpful for moving logs around. 

Behind the stove, near the wall but close at hand, is a tool stand. This stand holds tools that aren't used every day, along with our wood bag - keeping it away from a stray spark or coal that might unknowingly exit the stove.  Since we need to carry our firewood down the hall and round the corner, I sewed this wood bag our first winter on the farm to keep the wood mess to a minimum.  It holds a stove's worth of wood, and about the only wood dirt that is spilled is in front of the stove - which promptly gets swept up and thrown into the stove with our little hand held broom/dust pan. (You can find my rough pattern for this wood bag here, or you can find similar ones for purchase.)

Also hanging on this tool stand is a broom (which came with the set and is mainly decoration) and two tools used for sorting hot coals and emptying ashes.

The scoop on the left with the holes is used to separate coals from ashes when a fire burns out.  Very rarely do I need to use a match to get a new fire going. Buried within the ashes of a burnt out fire are usually enough coals to get a new fire to flame.  All I need to do is push the ash to one side of the stove, work from front to back scooping up ash, shaking or tapping the coal scoop on the inside side of the stove to sort out the coals, and then dump the coals on the opposite side of the stove.  This provides a nice pile of hot coals which quickly starts up new fires, especially with the help of our blow poke.

While I have a nice pile of ash on the inside of the stove, I also take the opportunity to empty the ash. The long handled scoop on the tool stand allows me to collect all of the ash from inside the stove, which in turn is dumped into our ash bucket.  The ash bucket did come with a handy scoop for more carefully getting out ash from the front half of the stove, but when there is still a nice pile of hot coals within, the long handled scoop - and the fire gloves - are much appreciated!


Although not stored by our stove, I do want to mention one last tool that we use at least once a year.  A chimney cleaning kit is very important for the safety of your house and your family if you don't hire someone to clean your stove pipe.  The cleaning brush (sized to match your stovepipe) is attached to as many rods as needed to work down to the bottom of the stove pipe.  Cleaning out a chimney needs to be done at the start of every season, making sure that nothing has plugged the chimney (birds nests, leaves, whatever.)  It should also be used anytime you think you might be getting creosote build up in your stove pipe - especially if you have been burning a lot of cooler temperature fires.  This is a job I actually enjoy doing since I am the one that doesn't mind heights.  It gives me an excuse to crawl on top of our house and enjoy a view of our farm not many people get to see.
So there you have it - what it takes to keep the fire burning in our house. 

Apart from needing to keep the woodpile stocked, which Ethan really doesn't mind when he can find the time, the only time that I dislike having a wood stove is when we leave in the winter for a couple days and come home needing to put the kids to bed. Thankfully, our house is well insulated and has large windows facing the sun so it doesn't get too awfully cold. The few days being gone, however, are far outweighed by the savings we get of not having to pay a heating bill, by the cozy warm-you-to-the-bones heat emitted by a wood fire, and even by the family time we have together when we all go out to cut wood.

As many say, a wood stove warms you twice: Once when you cut the wood, and once when you burn it.


Follow The Beginning Farmer's Wife on Facebook for additional personal peeks at building a family farm.


Tools of My Trade
You can check out more details about some of the items above from the following Amazon affiliate links.  Many of these items can also be found at your local farm or hardware store.

Monday, November 19, 2012

To Clean Out a Clothes Closet

As I have said many times, it's not as much the size of house or number of people in the house that makes a house overfull . . . it's the amount of STUFF in the house.

We are in a constant battle of making room in our house, and just this fall I have come up with a way to keep our closets from getting overcrowded. 

To start with, you will need to be semi organized - keeping long sleeves together, short sleeves together, dress shirts together, etc. Once you have gotten that taken care of, you are ready to go.

When you put away your clean clothes, hang them at the BACK of the area where they belong.  Next, make a habit of choosing your clothes from the FRONT of the type of clothes you are wanting to wear.  Do likewise with your dresser - stick the just laundered clothes on the bottom of the pile, choose from the top.

It will soon become apparent as to which clothes you are continually skipping over because you have something you like better in back of them.  These skip over clothes are the ones that you seriously need to ask yourself why you keep them. 

Two helpful questions when dealing with stuff:
  1. Is this adding to or taking from my life. (The taking from usually shows itself as taking away time with shuffling it around because it is in the way or shuffling more important things around because the lesser is taking up space that could be used otherwise.)
  2. Could this item bless someone else more than it blesses me?

So there you have it.  Since I just hung up Ethan's clothes and told him the method to my recent madness, I thought I would share with you as well. :)

Friday, February 11, 2011

A Wood Stove is Good For . . .

1When we built our house we decided not to put a furnace in. Without a furnace, we wouldn't need to put in duct work (we don't have central air either) which would save money with building expenses.  Heating with wood would also save quite a bit on heating bills.
The stove is the black square in the middle.
So we did our research and purchased a wood burning stove.  It sits right in the middle of the house to help the heat be evenly distributed.  We also have ceiling fans in the living room, kitchen, and 3 bedrooms to help move heat around as well.

Our stove does a great job heating the house.  In fact, I am usually cold when I go visit other people's houses in the winter.

We have found that the wood stove is good for many other things though, especially when you live on a farm.  Here are just a few:
During the day it is clear in front of the stove - at night we put it to full use!

  • hanging clothes on a rack close by overnight to not have to use the dryer
  • thawing frozen hoses (see Ethan's blog)
  • thawing frozen food when placed in a pan on top
  • raising bread when placed on a rack on the "cooler" level on top
  • warming baby pigs born in the winter whose momma didn't take to them right away (the momma is not going to stay, by the way)
  • a cozy spot for a sleeping baby in a swing
  • stimulation for a baby who is awake (both of my farm babies have enjoyed the flicker of the fire and the contrast of the stove pipe going up to the ceiling)
  • a chance for young ones to have responsibilities - helping with the wood pile
  • a chance for some exercise - collecting and splitting the wood 
  • a place to hang and dry wet coveralls
  • a place to unwind in front of
  • a place to roast marshmellows for winter Smores.  (I haven't done this yet, but I do think about it!)
Like I said, those are just a few.

Although there are times when a furnace would be nice (when we are gone, have other things to attend to besides wood, or the coldest of nights when it should have a refill), we are quite happy with our wood burning stove.  After all, can you make a list like that with a furnace?

Saturday, February 5, 2011

Diaper Pails

We are now starting our 4th round of cloth diapers, with 2 using them at the moment. (We use prefold diapers and diaper covers that my mom and I made, similar to the ones you can buy. If you would like to read more about our cloth diapering, you can do a search on the right side of my blog.) With 6 1/2 years of cloth diapering under my belt, I have learned a lot and changed a lot!

One of the things that I have changed is our diaper pail. I started out with a trash can with a flip up lid. I used an ice cream bucket to carry soiled diapers to and from the toilet to dump into the trash can and then rinsed the little bucket. It worked okay, but I wasn't completely sold on it. Not only could you eventually tell which room the diapers were in, but the trash can/diaper pail also had to be cleaned on occasion.

When we still lived in town, I started acquiring buckets. I needed a few for collecting coffee grounds for composting, but I guess I decided that it would be a good idea to keep getting more buckets. Some I got from the Hy-Vee bakery, but most I got from a local deli. They had about 2 a week from their pickles. And these are the buckets that I affectionately call "the pickle bucket". Creative, huh?

When we moved to our farm house, I did not move our diaper pail. I had used and cleaned it for 4 years, and I thought it would be best to just throw it away. So once we got into our new house, I needed something for the cloth diapers. The handiest thing I had around at the moment were some unused pickle buckets. I grabbed those, and it was one of the best diapering changes I have made yet.

So now our diaper pail is "the pickle bucket". Here is what I love about them.
  • The lid has a rubber seal so no smells seep out.
  • 2 pickle buckets stack quite nicely, taking up little space. They fill up at just the right time and make just the right size load to wash.
  • Diapers are easy to load into the washing machine. Just take the lid off and dump them in.
  • They are easy to handle, with their convenient carrying handles.
  • When they are getting a bit "used", I don't feel I have to clean them. I can just throw them out.
  • And . . . new pickle buckets have a rather pleasant "pickley" smell for quite some time when you open the lid. Sure beats the other smells!
As to where I keep them, they are in the laundry room. I change diapers in the bathroom, and the laundry room and bathroom are connected. (You can see our house layout here.) I know they aren't as beautiful as a white garbage can with a lid, but they are out of site - and they work so much better!

I know there are a lot of you out there who use cloth diapers as well, and many who have used them longer than I have. Since I still have a bit to go with them, and I'm sure there is more that I can do differently, I'd love to hear your best cloth diapering tips!

Follow The Beginning Farmer's Wife on Facebook for additional personal peeks at building a family farm.

Tuesday, September 21, 2010

Storing Sheets

I was visiting my friend in Minnesota last year, and she had the genius idea of storing sheets by keeping the sheet set inside the pillowcase. Now why didn't I think of that?!

Fold the sheets (You can even skip this step if you don't like folding sheets!)
Place the sheets inside the pillowcase
Fold up the pillowcase

Saturday, February 6, 2010

Cloth Napkins, Hankies, and Milk Jugs

I'm always looking for ways to cut down on spending. One of the things that I have tried to cut down on is household consumables. A few years back I decided to make some cloth napkins and hankies.


To do this, I went to Walmart, when they still had their fabric department, and bought some inexpensive flannel. I then surged around the outside to make squares. I ended up with stripped wash cloth napkins, pink hankies for Hannah, and blue hankies for Caleb.

These have worked out really well. The napkins are great for cleaning spaghetti stained faces, and the kids can keep their hankies in their pockets or on their dinner chairs. They can go through as many as they would like, and if one get's left around, there's no guessing as to who's germs it holds.


I've tweeked the laundering of the napkins and hankies a bit to keep laundry hampers from becoming musty and gross. I now have a milk jug (easy to toss when needs replacing) under the kitchen sink that these napkins get dropped in. I put a touch of vinegar in the water, which keeps the water a bit more fresh and have a drip protector under the jug in case the kids don't get a cloth in all of the way and it wicks water out.


I also have a post it note sticker on my warm wash cycle, so whenever I do a load of warms I remember to retrieve the milk jug.

This seems to work out great for our kids, and it has really cut down on the paper napkins and kleenexes that we buy.
Related Posts Plugin for WordPress, Blogger...