Follow The Beginning Farmer's Wife on Facebook for additional personal peeks at building a family farm.

(Be sure to click both the Facebook "like" and "follow" buttons to not miss any posts.)

Monday, November 11, 2013

To Roll Out a Pie Crust

Two Saturdays ago we had our first major event (besides the Farm Crawl) on our farm, the Crooked Gap Farm "How Do They Do That" Class.  Our guests arrived at 9:00 a.m. and stayed until around 8:00 p.m.  It was a day full of tours, questions and answers, marketing discussions, and our insights on the mix of family, farming, and finances.

It was also a day full of Crooked Gap Farm food!

After I finished teaching school to our kids for the day, I spent the week before the event planning and preparing food for the 14 terrific individuals who were our guests, along with our family of 6.

Our Lunch was:
  • CGF pulled pork sandwiches (on store bought buns)
  • CGF tomatoes for the sandwiches
  • CGF canned pickled banana peppers for the sandwiches
  • CGF boiled potatoes, containing 3 different varieties of potatoes
  • CGF buttercup squash
  • CGF fresh cut carrots 
  • CGF watermelon
  • Harvest Cookies containing a CGF heirloom pink banana pie squash and CGF "Run of the Farm" eggs
(Thanks to Diana, from My Humble Kitchen, for the photo!)

Our Supper was:
  • CGF Beef and Vegetable Soup with the following ingredients from our farm : our heritage grass-fed Dexter beef, beef broth, carrots, onions, potatoes, summer squash, green beans, yellow wax beans, and sweet corn.
  • CGF cut carrots
  • Homemade rolls, made with CGF home rendered lard
  • Strawberry Rhubarb Crisp made with CGF strawberries and CGF rhubarb
  • "Pumpkin" pie, made with a CGF heirloom pink banana pie squash and CGF "Run of the Farm" eggs, as well as the pie crust being made with our CGF home rendered lard.

Over the summer I have tried to involve my kids in as much of our food preparation and preservation as possible, and this week of preparing for our class was going to be a very full week of cooking.  I soon realized that that a lot of what I was cooking involved knives, cutting, and chopping, and I was having a hard time trying to figure out how to involve the kids rather than keep shuffling them away from my sharps. 

One afternoon during the kids' rest and independent time, however, was my pie making afternoon.  It was the perfect opportunity for me to teach some pie making skills to our 7 year old daughter so I pulled her away from her independent activities and had her come out to the kitchen.

One of the things that I tell my kids is that if you want to learn how to do something, watch first.  After you have watched the process, ask any questions you have bouncing around in your head.  Once you have done that, you may try it out.

I had 3 of my pumpkin pies to make so while I was mixing the dough, rolling out each crust, placing them in their pans, and putting on the finishing touches, Hannah watched on.  I could tell how eagerly she wanted to help me with the pies, but she patiently watched as I finished up the first, and then the second, and then the third.

After I was completed, I balled up my remaining pie dough and told her it was her turn, much to her surprise.

I have a little six inch diameter pie glass that isn't good for much besides making mini pies with leftover pie dough.  But, when you have a daughter, that reason is enough!

After all, my grandma taught my mom how to make pie crusts.  My mom in turn taught me, which led to me winning 3 champion trophies when I entered my pies in the pie baking contests during my 4-H years. I still use that same recipe (which can be found on our farm's recipe blog), and I hope that Hannah will some day pass it down as well.

So after finishing my three pies, I began my kitchen clean up and let Hannah work on her pie crust all by herself.  The only thing I helped her with was forming the ball of dough into a disk.  She tried, but it took a little more muscle than she could muster. After that first step, I continued to clean up around the kitchen, pausing long enough to snap some pictures of her work.

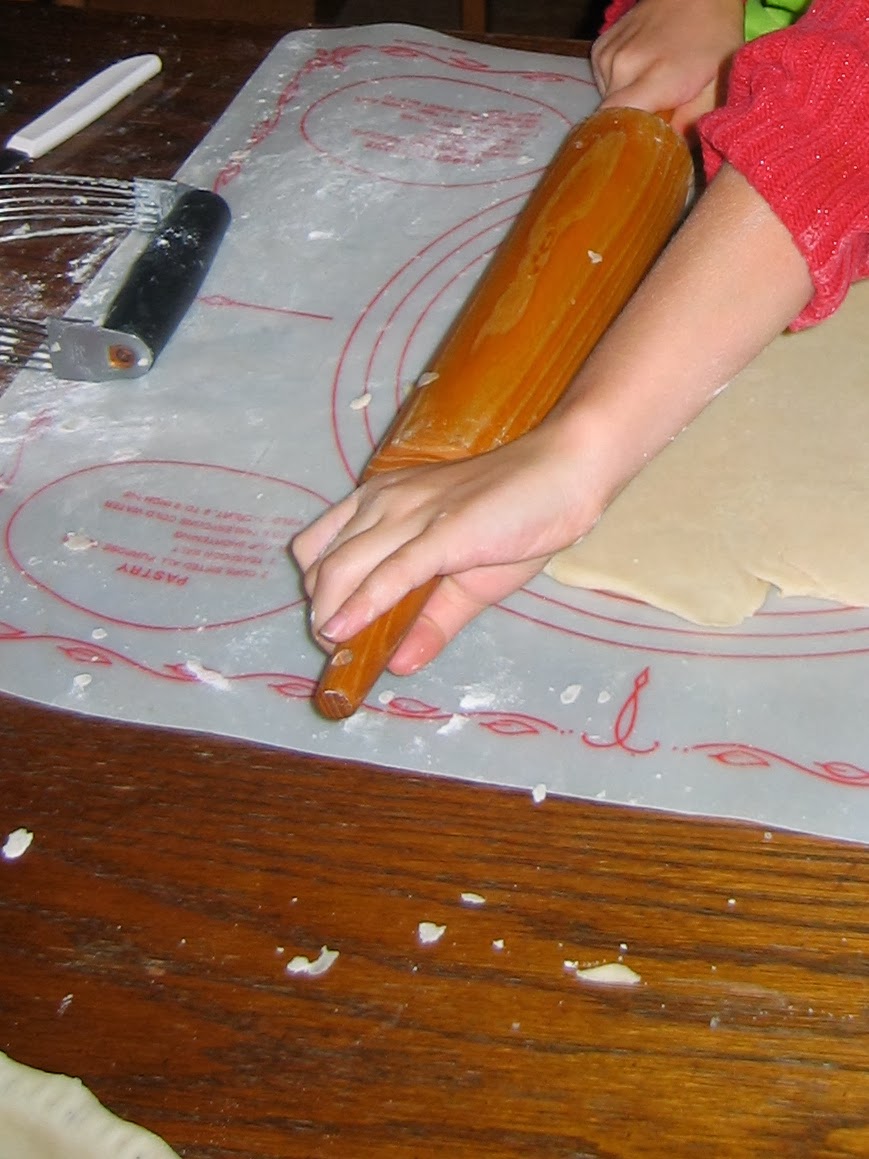
Hannah paid careful attention to the dough as she rolled it out, being sure to keep her pie mat and rolling pin dusted just enough that it wouldn't stick to the mat or the rolling pin, rolling it out easily and gently.  She did a good job not getting too much flour out either too, which would dry out the dough.

As Hannah rolled out her dough, she tested the size of her crust by carefully holding her pie glass upside down, looking for an extra couple inches of dough all around the glass.

Each time the pie dough wasn't wide enough, she worked the wider and thicker portion of the dough to the narrower portion.  She was careful to roll from the center of her pie dough so that she wouldn't pull up and tear the edges of her pie crust.

Once her crust was wide enough, she carefully folded it in half and scooted her pie dish underneath.

After the pie dough was reopened onto the pie dish, she carefully lifted up the outside edges of the pie dough in order to drop the dough down into the pie dish.  This lifting and dropping prevents the dough from being stretched or torn while it is being fitted to the pie dish.

Hannah then completed her final step of making her pie crust by pinching up around the dough around the outside of the pie dish and then trimming off the excess.

As you can see, there will still be a bit of pie dough scraps.  These scraps are perfect for rolling out again to be cut into pie crust cookies, which can be brushed with milk and sprinkled with cinnamon and sugar.  They are yummy to eat on their own or can be used to decorate your pies, as I did with my "pumpkin" pie.

As we talked about in our farm class, there are a lot of sacrifices that come with starting up a farm, especially when you are raising a family.  Days are full, bank accounts often aren't. It is hard to find time to get away as a family, and if that time was there, well . . . the money to do so might not be.

It is a choice that we have made.

I have also made the choice that I'm going to be purposeful in including our kids as we go through our days: To let them tag along beside us with our guests during our farm classes, even though it would be much easier on me to send them to a friends house.  To plant a couple extra cherry tomatoes plants in the garden, reserved for helping hands to snack from. And to make sure I plan my recipe to have enough pie dough for one last pie, a pie carefully formed by little hands in my small pie dish which I keep around for one purpose only.

Follow The Beginning Farmer's Wife on Facebook for additional personal peeks at building a family farm.

Tools of My Trade

 Linked is a set of 2 simple yet functional 6 inch pie plates dishes, perfect for daughters, granddaughters, or for making 2 smaller pies from one recipe. You also might be able to find some little 6 inch pie dishes at garage sales or second hand stores.

Although my particular pastry mat seems to be vintage now, there are many other pastry mats out there, sometimes even found at garage sales. The circles on the mat can be used as a guide for rolling out your dough the right size, but my favorite use for them is to contain my flour mess.  Cleaning is so much simpler when you can lift up your mat, dump excess flour into the trash, wash off anything that remains in the sink, and then finish your clean up with just a swipe or two of the dish rag across the table, creating no gummy messes.!

Tuesday, November 5, 2013

Ripening Tomatoes . . . and Cats

This week I set out to make a post about ripening green tomatoes. 

I was going to write about how I gathered all of the green tomatoes out of the garden before the first frost a couple weeks ago, about how I carefully checked them over to make sure they were all in good shape as to not spoil other tomatoes around them, and about how I have kept them out of the sunlight as suggested while waiting for them to turn red.

I was then going to mention how valuable these green tomatoes are, as I have already done one batch of 11 quarts of tomato juice from them.  I was also going to share how many quarts this last batch of ripened tomatoes produced (17 quarts). 

While I was sorting out the bright red tomatoes that were once as green as could be, my 4 year old asked me if he could help me.  Of course he could.  Why hadn't I thought to ask him? 

He edged in beside me and carefully started picking out the red tomatoes.  As he worked, he lifted up a tomato to his nose and proclaimed with a smile that it smelled like tomato juice.  He worked steadily as he clutched his stuffed cat with his other arm.
His cat. 

Two summers ago Isaac fell in love with the addition of cats on our farm.  He was 3 that summer and he spent his warm sunny days building houses for our cats. Two were gray, black, and white striped.  One was yellow. 

He had so much fun over the summer with these cats that we decided to work some cats into his November birthday. He received a little cat figure from the farm store to be added to their set of farm animals, as well as a little book with a cat that perfectly matched one of the darker cats.

His birthday celebration at home was going to be in the evening. We put the kids down for nap and rest time.  I prepared for when they were to wake up while Ethan went out to do some chores.

Not long afterward, Ethan came in quiet and long faced.  One of the darker cats had gotten up inside the truck, under the hood.  When the truck was turned on to be moved, the cat got caught in the belt.  It didn't survive. We decided to tell the kids the next day, after Isaac's birthday.

Isaac and our 1 1/2 year old spent many hours playing cats that fall . . . with their stuffed dogs. For Christmas, I gave Isaac and Jonathan each a stuffed cat.  Isaac, a yellow cat.  Jonathan, a black cat.  Isaac's favoritism soon turned toward our yellow cat, "Puss in Boots".

This summer the boys continued to smother our cats with love, as much as they could find them.  As the summer progressed, however, "Puss in Boots" started causing a little too much farm mischief.  We had gotten him as an older cat, and he had never learned to see our small farm animals as comrades, as kittens growing up on the farm would do.  It came to the point of him needing to leave our farm to live at a friend's house.

Isaac was heartbroken.

Still, Isaac and Jonathan continued to play with our remaining cat outside, and their little stuffed cats were constantly with them in the house.

This fall, while on a hayride, I spotted a small yellow kitten . . . a little yellow kitten just like "Puss in Boots". I knew the family who owned the cats cheerfully gave away kittens. With their permission, our new "Puss in Boots" spent the rest of the evening peeking out of my coat, waiting to head to its new home.

It didn't take me long once home to notice this little kitten seemed a bit lost penned up by itself as it was becoming acquainted with our farm, and our large dogs.  A quick message back to the family revealed that they did have a black kitten to match Jonathan's stuffed kitten, and they would be more than happy to add in a little calico female too if we would take it. 

And so arrived our 3 new kittens.  From the beginning, the kids have taken extra special care of them. Grabbing them up when vehicles were moving, shutting them up at night to keep them safe from larger animals, and sneaking out on the porch as often as able to smother them with attention.

Isaac's stuffed cat, now more flat and limp with love than plush, followed him around the house all the more.  I benefited from frequent hugs daily accompanied by thank yous for giving him his stuffed cat.

This past Saturday our farm hosted an all day event at our farm.  We had a group of individuals scheduled to come for an in depth tour of the farm, with 2 full meals included prepared from the produce and meats from our farm. We had been preparing all week, gotten up early Saturday morning, and we were very excited about the day ahead.

About an hour before our guests were to arrive, I continued to get ready inside.  Ethan headed out to move our truck and trailer.  And then he came in.  Straight faced.  Quiet.  A cat had ran right behind him when he was parking the trailer.  It had been hit. 

I asked him which one.

Puss in Boots.

We told Isaac.

I realize that cats come and go no matter where you are.  I realize that life is difficult no matter what you are involved in.  Sometimes, though, I just get tired of the struggles that farming, especially beginning farming, brings along.  The days that the kids feel heartache are the days that hit me the hardest.

So as Isaac hunkered down beside me, his one year worn with love stuffed kitty in his arms, wanting to help, enjoying the aroma of the tomatoes from our summer's labor, I was thankful. 

Yes, life on the farm is full of struggles.  But it is also full of lessons.  Lessons filled with the benefits of our hard work.  Lessons filled with working through life struggles and losses, knowing they will come again and come weightier as life progresses. Lessons that prepare and teach the kids how to navigate through this world.  Lessons for me in how to instil Hope to the next generation.  A Hope that sometimes needs an extra dose of patience and Faith in what is promised to come. 

The next time I have a project to do, I will try to remember to invite my little ones over to help me before they have to ask.


Sunday, November 3, 2013

Repurposing

repurposing :  to give a new purpose or use to 

There's a lot of repurposing that goes on around our farm.  We repurpose materials, structures, livestock areas . . .

There is also a lot of repurposing that goes on in the house. I also repurpose materials and storage spaces, as well as our motivations and time spent doing things.


I have decided that it is time to repurpose my blog.

My blog has slowed down, halted, and became virtually silent as we transitioned from our start up of the farm into our actual farming.  Some of this has been due to the addition of more little blessings running around the house.  Some of it has been due to the swelling of demands to keep a beginning farm up and running.  Some of it has just been due to a lack of purpose in my posts.

Sure, I have always wanted to keep a journal of our journey.  But the lack of purpose of keeping that journal started to creep in.  

Even so, I have continued to want to find some way to continue my blog. Not just for the readers who may be out there, but for our generations to follow . . . to see how we persevered with where we felt called, to see how the Lord provided for where He had us, and to know the history behind our farm. (All assuming the farm continues on - as well as Blogger!)


Yesterday we gave an in depth tour of our farm to 14 individuals.  They arrived at 9:00 am.  We combed the farm viewing the different enterprises, discussing how and why we do things the way we do, shared how we attempt to balance family, farm, and town jobs, discussed finances, and ate a lunch and supper of Crooked Gap Farm produce and meats that I had spent the week preparing.  Our guests left around 8:00 pm and left me with a desire to repurpose my blog.


Over the last year I have had numerous individuals asking me how I manage the home, the garden, the family, and even the farm in my role as a stay at home, homeschooling, farming wife and mom.  Many have asked (and re-asked) for classes on some of the thing I do. I would LOVE to hold these classes and share the things that I have discovered from my journey of cooking with a box of Kraft Macaroni and Cheese in town to preparing 2 meals for 14 guests and our family of 6 with foods almost completely raised and grown on our farm.

The wall I run into is lack of time. And lack of facilities. And lack of supervision for our children. (Ethan has been working ~60 hours/ week of off the farm work, along the daily chores and 6 months of Saturday farmer's markets . . . and all else that goes along with keeping a farm business running.) 


Which brings me to my next thought.  Children. I have had a number of conversations lately about how to make family work with starting a farm. A wise friend shared with me a couple years back that our culture spends so much time following our children around (not that it's wrong to join in their interests) and so little time having our children follow us around.  Following us to learn from us, to see the beauty in what we have learned to hold beauty, to encourage them, to share with them, to shower love upon them.


In Titus 2:3-5 we are encouraged to
"Similarly, teach the older women to live in a way that honors God. They must not slander others or be heavy drinkers, Instead, they should teach others what is good. These older women must train the younger women to love their husbands and their children, to live wisely and be pure, to work in their homes, to do good, and to be submissive to their husbands. Then they will not bring shame on the word of God." 

These conversations with my farm friends looking for help on how to provide for their home, my personal friend who encouraged me that it was okay that we couldn't join in the American chase with our children, and my Heavenly Friend who continually shows me the way to fullness of life, have all brought me to repurposing my blog. 


I still hope it to be a journal throughout our farm journey, but as I do this I hope it to be an opportunity to share with others how to love their husbands and children, to live wisely and be pure, to work in their homes . . . all the while challenging myself and encouraging my readers to bring the next generation along with them so that they can do the same. 

Saturday, August 17, 2013

It's Canning Season . . .

It's canning season.   I've been canning throughout the summer, but now is the time where things really pick up.  This time comes with mixed feelings.

In one sense, it is wonderful to see my efforts in the garden come to fruition . . . or vegetablition, whichever you prefer.  After all of the planting in the spring, the mulching, the weeding, etc - it's nice to get some rewards out of the garden.

On the other hand, some days I just don't want to deal with the garden.  I've been in there hours on end for the last 4-5 months. I have other things I'd rather do, or just other things I need to do, or I just want to go to bed.  But when the produce is ready, the produce is ready.  If you don't take care of it, it spoils.  And then what was the point of putting in all of that labor beforehand.

On those days, I have chosen to tackle my garden tiredness two ways.  First, I have realized that my hobby has turned into my job.  It's a way that I can save money for our family.  A penny saved is a penny earned, right?  And then I remember that I am blessed to be able to have a job, a way to contribute to our family, that is at home.  On the farm.  With the kids. (Who are not always in the garden with me, mostly because of their age, but are playing nearby as I watch their joy in being on our farm with each other.)

The second thing I do is to try and build memories.  When I take my 5 gallons of beans needing to be snapped on our weekend away visiting family or to Bible study or to a visit with family friends, I have often had our friends and family offer to help. (Which isn't why I take them - it just needs to be done.) Or when I sit on the porch with the kids after supper, I call them over and we have a little contest.  Can they keep up with me snapping the ends off of the beans faster than I can snap the bug bites off?

And with each memory I put a mark on the lid.  GK for when I sat with my grandma snapping beans as she shared with me about the orchard that was on her farm when she was growing up.  How their large farming family was poorer than poor but let friends and family come and not purchase but freely pick from the 50 or so apple trees that were on their farm when they purchased it. WBS for my friends in my Women's Bible Study who snapped beans as we visited and shared about the Lord.  I and J for my two littlest boys who joyfully plucked tomatoes out of the cold water bath in order to hand them to me to prepare them for filling up the quart jars.

After those marks of memories go on the lids, the jars go into my pantry.  As the pantry turns from empty jars to a colorful array of jars packed with the harvest, I am reminded of how the Lord has provided for our family and has blessed my efforts.

After I have cleared out and tilled up the garden, and as the days grow shorter and nights turn colder, we start pulling out those jars one by one to fill the plates on our table.  And as I pop off the lids, with the sweet little marks from our children and the marks I put on as well, I am reminded of the memories made throughout the summer and of those who have blessed our family as they have joined me while I do my part for our family.

Follow The Beginning Farmer's Wife on Facebook for additional personal peeks at building a family farm.


Tools of My Trade
Beans must be pressure canned due to their low acidity in order to kill all bacteria that would cause dangerous food born illnesses. They can be safely canned by using the recommended times and pressures given for your altitude. I have a couple older Mirro pressure canners given to me that work wonderfully, and my mom has a newer one that she loves as well. If you do some asking around, you might find someone who has given up canning and has one available, or you can look for one like the one pictured below. It should hold around 9 pint jars or 7 quart jars.


I also have some canning tools that are invaluable. The wide funnel helps keep messes to a minimum when filling jars. When I heat my lids, I just drop them into the hot water of my canner and then lift them out with the magnetic wand. The jar lifters are great for getting those hot jars out of the canner as well. You can buy these tools separately at many stores, or you can purchase them in a kit which contains other useful canning tools, such as the one pictured below.

Wednesday, July 31, 2013

Name that Grass - Round 1

Okay all of you homesteaders and farmers out there.  Here's a little challenge for you.  I went on a walk with my kiddos last night and brought back seed heads from some of the grasses along the way.  We are going to try to identify them, learn their names, and hopefully learn some facts about them. 

I realize it helps to know their height and see their leaves, but how can you do on naming them, going from left to right?  As of tonight, I'm certain of 2, fairly confident of 3, and have some ideas for 2 others.  

You can click on the photo to see it larger. Feel free to leave a comment here on on my original post on Facebook with your guesses or expert answers! 

And for being a blog reader, I'll give you some insider information.  These grasses were collected on the part of the pasture that has not been heavily over seeded by us. It had been in the CRP program for 10 years and had been planted with native prairie grasses.  The area includes high and dry land as well as land that stays fairly moist from a small spring and runoff from rains. Round 2, which will be coming soon, will have more grasses from the area that we have over seeded.

Have fun! :)

p.s.  Sorry, there is no prize but the satisfaction of knowing that you know your grasses.

Wednesday, May 29, 2013

I've Become a Soapmaker!

Way back in October of 2011 I wrote a post about rendering lard.  I mentioned that I had a project up my sleeve, and a year later I finally learned how to make soap from a soap maker.

Since the beginning of the year I have been enjoying making what I call "Crooked Gap Farmcrafted Soap".  On our website, it is described as:    

Our Crooked Gap Farmcrafted Soap is unique in that we strive to use as many ingredients as possible produced on our farm, gathered from local sources, or commonly found on a farm. Our soap is not only crafted on our farm, but from the farm. We are confident that you will find our farmcrafted soap to be like none other!

I've taken some pictures along the way, although not a tutorial on how to it, they do show some of the process.

This first picture is the fats melting on our wood stove.  The majority of the oil that I use is lard that I render from our hogs.  I also add in a bit of coconut oil for some extra bubbles and cleansing qualities.  I wasn't really sure what lard soap would be like, but we get quite a bit of it with all of the hogs we take in.  I've you have followed my blog, you might have noticed that I am quite frugal and like to put as much as I can to use.  It only made since to use our lard to make our soap, and I have been so impressed with the qualities of it!  (Our customers have been as well!)  This is the first winter I haven't had cracked and bleeding fingers in the winter for 10 years, even while I have been doing cloth diapering, which dries out your hands quite a bit (all of the moisture being drawn out of your hands when folding.)

One of the things that fascinated me the most with the soap making is watching the glycerine form.  This photo shows the glycerine forming in my soap, which turns back to white after the saponification process.  The glycerine is what conditions (helps your skin retain moisture) in the soap.  And lard soap produces a lot of glycerine!


I also enjoy creating new "recipes" for my soap. It's a fun little challenge to think of what farm available ingredients I can use and how to use them.  I was excited this week to use spinach from our garden in one of my soaps. (The bottom brick in the photo.)

Once the bars have hardened (mine take a good 24 hours or more), they are ready to be cut.  This is also one of my favorite parts of the process. It's almost like opening a Christmas or birthday present. I have an idea of what I've put into the soap, the methods I've used to combine the ingredients, and I can see the top, but it is still hard for me to guess just how that bar will look when I cut into it.  Maybe I'll be able to predict more as I have more soap making under my belt, but right it is usually a surprise.

After the bars have cured for a month, they are ready to sell.  We sell them off of our farm, at the Downtown Des Moines Farmer's Market, and I also ship them. This is a photo of some of the bars I have made, although the patterns are hard to see when they are displayed with the tags on.  You can head over to my webpage to see what they look like without the tags.

In my pre-farming life I enjoyed scrap booking, card making, and doing other creative things.  That has kind of disappeared since we started the farm.  One reason was that with starting the farm from a blank piece of land, having more children - who were also growing to ages where homeschooling was more demanding, and then taking care of the farm, there just isn't that much time to be creative.  The other reason is that I did not feel comfortable buying things for hobbies, and there were just too many farm/family things needed to put on gift lists too ask for supplies for projects too. So this soap making has recently filled a little creative void for me lately, without me having to feel guilty about spending time or money on being creative.

It has also been a lot of fun to learn another skill, and I am enjoying educating a little on it as well. (A little since I am still educating myself!)  If you are interested in learning a bit more, you can check out the info I have included on my webpage, listed a couple times above, and maybe someday I'll find/take the time to do a post in photos of the whole process . . .


Thursday, May 9, 2013

Landscaping Advice Wanted :)

Things around here have been a bit crazy, to say the least, the last 4/5 years.  We are now into the start of our 5th year on the farm, and I am (hopefully) able to landscape the entrance to the house, and the rest of the homestead this year.  

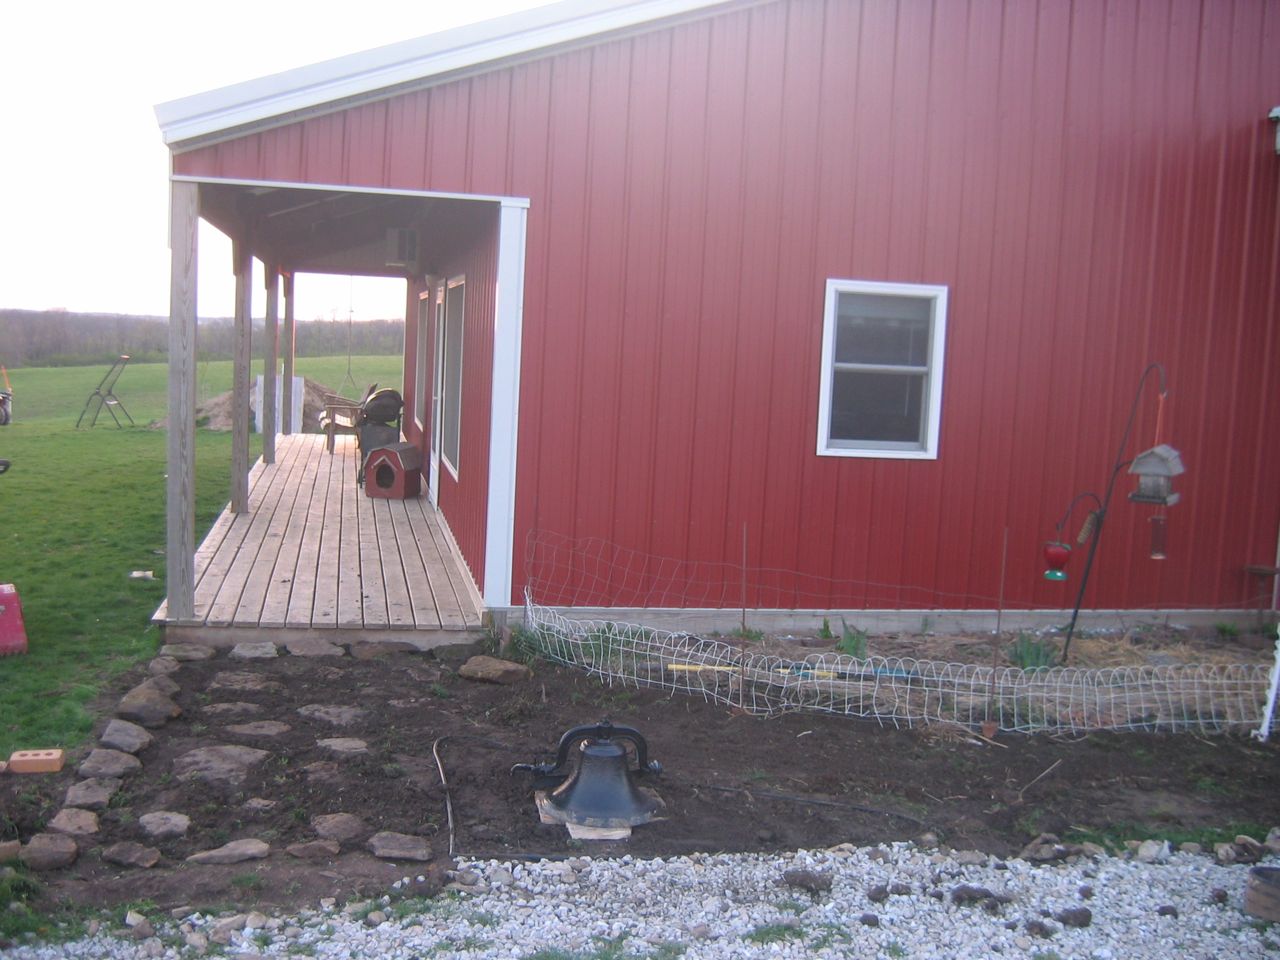
Apart from our mudroom entrance and lawn, the entrance to our house has been a mixture of mud and weeds.  This week I tilled up the random weeds and had the kids help me bring some stones up from our ravine.  I have a general idea of what I want to do for the walkway to the house and walkway between the porch and mudroom door, but I can't figure out what materials to use. (I can think of many things to use out of our budget, just not within.)  So I am asking for a blogging brainstorm from any followers that are still out there!

You should be able to click on the photos to enlarge.

This first picture shows the walkway to the porch from the drive.  The stones I put there temporarily are to keep feet from being muddy.  They are too soft of stone to be permanent stones (one is already broken). The triangle area with the bell will be ornamental grasses with the bell on a post.  There is also another walkway behind the bell leading to the mudroom entrance.  The flower bed against the house will be for roses. (It is on the east of the house).


This picture shows the walkway to the mudroom.

This picture shows the full area.  The flower bed separating the drive from the lawn will be for some shorter bushes and spring bulbs. 
So for my question?  What would you do on with a low budget for these walkways and the borders for them.  I would love to do large flat stones but our farm's stones are too soft, and I'm pretty sure buying them would be majorly out of the budget.  I have thought of pea gravel.  Not my favorite choice because of winter shoveling, but it would work.  I have also thought of scattered flat stones with pea gravel in between. I think that wouldn't hit the budget either.  As for the borders, I was thinking stones again, but more rounded ones.  I could probably scrounge enough of those up here and there.  I do know I want it to look natural - cement is not high on the list at all.  What do you think??

Thanks so much!
Related Posts Plugin for WordPress, Blogger...