
 As I write this post, it is the beginning of February. This
may seem like an odd time to learn how to pressure can with gardens
tucked away for the winter, but in my opinion, it is the best time to
learn!
As I write this post, it is the beginning of February. This
may seem like an odd time to learn how to pressure can with gardens
tucked away for the winter, but in my opinion, it is the best time to
learn!
Think
about it, do you really want to be fumbling around with something new
like this when the weather is beautiful outside, when produce waits
impatiently to be harvested and preserved, and when mistakes (or what I
like to call learning opportunities) impact the crops you have worked so
hard to raise?
For
me, I would much rather have learned to pressure can in the off season
of the garden, which is one of the reasons I'm sharing my posts about
Beginning Pressure Canning with you now.
If you have never canned before, I encourage you to start at my first post, Understanding Pressure Canning. In
this post I give an overview on what you need to pressure can, what
pressure canning is doing, and how to ease concerns about the safety of
pressure canning - both during the process and with the food you have
preserved. If you understand pressure canning and have gathered your equipment, then you are ready to move ahead to The Pressure Canning Process.
The Pressure Canning Process
Because of this, I suggest that for your first few times canning, just can some water. That's right. Fill some jars with water, pretend it's food, and get to know your canner. So here it is. My most important photo tutorial ever: How to Pressure Can Jars of Water
Since
this is to prepare you for actually pressure canning food, I am going
to treat my water like it is a food that I am going to eat in the
future. My photo tutorial will include steps that might
seem a little silly to do with water. I encourage you to do them all. Not
only will it help you better understand the complete process of
pressure canning, but it will also help start a rhythm to your canning
to ensure you don't miss steps in the future. Please keep in mind that this is just
my overview, and it is not meant to replace the information that is
included with pressure canners.
Canning Preparation
Before you start canning, you will need to get your jars nice and clean. You can either run them through your dish washer or scrub them up with hot soapy water. You will also want to use this time to check for any cracks or chips on your jar. The slightest chip on the rim could hinder the seal on your jar.
If
you run your jars through your dishwasher, you can keep them hot and ready
to fill by keeping the dishwasher door shut after they have finished
washing. If you need to level your burner, you will need to use them in the leveling process.

Your next step will be to prepare the burner that your canner will be on, especially if you have unlevel burners like mine. It is important for your canner to be level in order for the steam to vent properly. If your canner is not level, your canner could possibly become over pressurized. This can lead to food being forced out of your jars during the canning process, which in turn could effect the seal due to improper head space or food within the seal.
Leveling
your canner doesn't take much time to do once you have done it a few
times. Plus, this time can also be used to prepare to heat up your jars. This is
an important step since contrasting temperatures of jars and the foods
going into your jars might cause your jars to break. If you have already
determined that your burner is level, you can skip the steps to level
your burner, but do still follow the steps to fill your canner and heat up any hand washed
jars.
 When you are leveling your canner, you will first want to put 2-3 inches of warm water into your canner which will allow for sufficient steam throughout the canning process. (Some recipes with lengthy canning times might call for more.)
 Next, you will want to fill your cleaned jars with warm water and place them in your canner. You
will want to use the same number and size of jars you will be canning
with to apply the same weight on your burner, which could effect how it
levels.
Next, you will want to fill your cleaned jars with warm water and place them in your canner. You
will want to use the same number and size of jars you will be canning
with to apply the same weight on your burner, which could effect how it
levels.You will also want to make note of where your water level is to watch for evaporation.
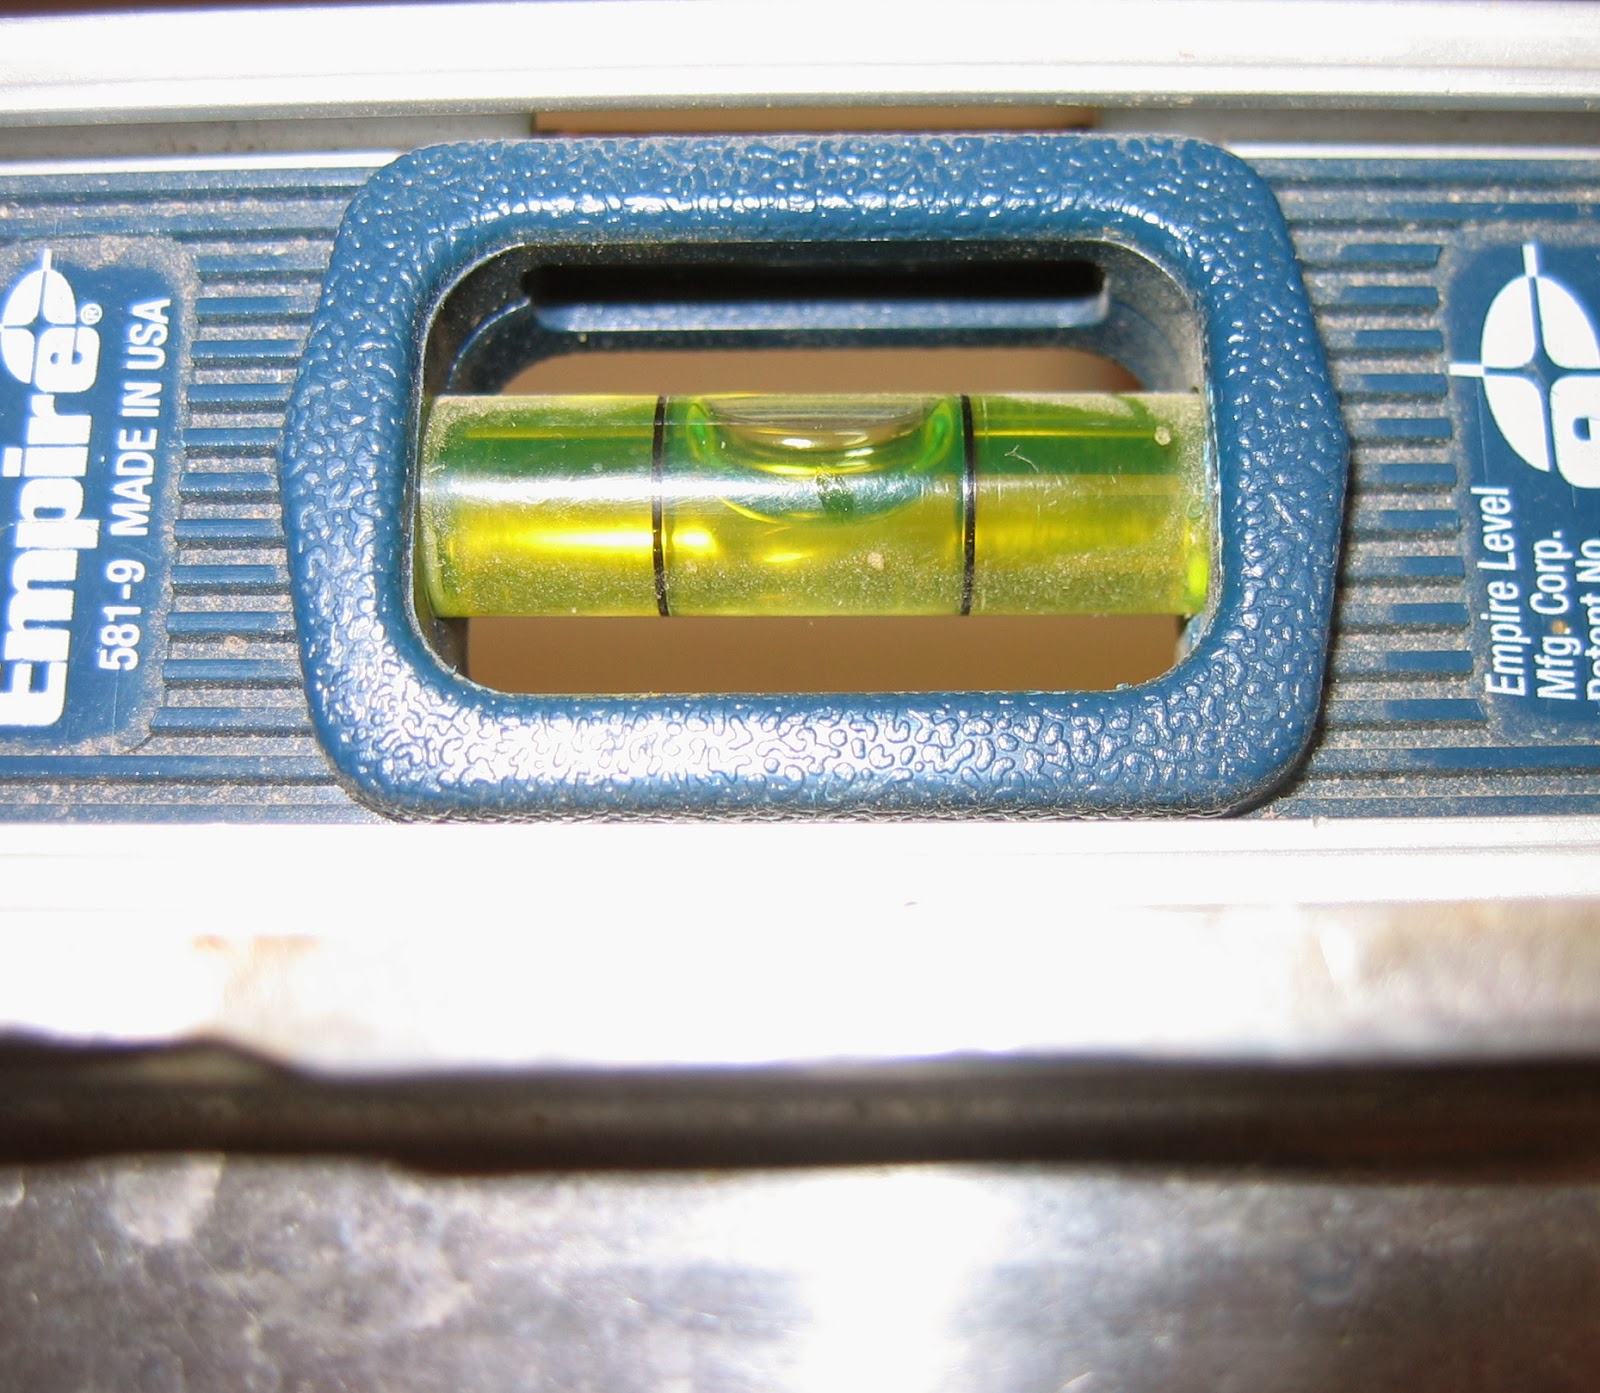
 Now
it's time to level your canner. You can do this by eye, but if you are
like me, you might feel more confident using a small level. Place your
canner on your burner and check the level of your canner both front to
back and side to side.
Now
it's time to level your canner. You can do this by eye, but if you are
like me, you might feel more confident using a small level. Place your
canner on your burner and check the level of your canner both front to
back and side to side. As you can see, my burner is considerably off level. You
can first try adjusting how the coils set on your burner plate, but if
adjusting your burner plate does not do the trick, you can
use washers, coins, or any other metal lift under your burner plate to
achieve a level burner. This might take a bit of trial and error the
first couple times with placement and various sizes of lifts, but if you
make some
notes or illustrations on what you did to help level your burner, you
will soon be able to level your burner in no time at all!
As you can see, my burner is considerably off level. You
can first try adjusting how the coils set on your burner plate, but if
adjusting your burner plate does not do the trick, you can
use washers, coins, or any other metal lift under your burner plate to
achieve a level burner. This might take a bit of trial and error the
first couple times with placement and various sizes of lifts, but if you
make some
notes or illustrations on what you did to help level your burner, you
will soon be able to level your burner in no time at all!
Once you are done adjusting your burner to level, be sure
to check that
your pressure canner is still very stable.
 Now
that your burner is level, you can begin slowly heating the water in
the canner until it reaches a gentle simmer (~180 degrees), about the same
temperature that your food should be. (If using a raw pack method,
meaning jars are packed with raw food followed by hot water or syrup being poured
into the jars, you can bring this temperature to 140 degrees.)
Now
that your burner is level, you can begin slowly heating the water in
the canner until it reaches a gentle simmer (~180 degrees), about the same
temperature that your food should be. (If using a raw pack method,
meaning jars are packed with raw food followed by hot water or syrup being poured
into the jars, you can bring this temperature to 140 degrees.)
Keep your jars heated in your canner (or dishwasher if you are not leveling your canner) until they are ready to be filled. If you are not filling
your jars shortly after this, however, you may need to replace water that has evaporated.
 About
10 minutes or so before you plan to fill your jars, you can start
preparing your lids and rings. In order for your lids to form a nice
seal, you will need to soften the sealant of the lids. This is done by heating your lids in a small sauce pan. It is recommended to heat these up to a light simmer, but heating them to boiling can actually increase the chance of them not sealing. It is also recommended to heat your rings, which can be tossed in with your lids.
About
10 minutes or so before you plan to fill your jars, you can start
preparing your lids and rings. In order for your lids to form a nice
seal, you will need to soften the sealant of the lids. This is done by heating your lids in a small sauce pan. It is recommended to heat these up to a light simmer, but heating them to boiling can actually increase the chance of them not sealing. It is also recommended to heat your rings, which can be tossed in with your lids. Food Preparation
There are times when you will have food that is quick to prepare, so you will want to have your jars, canner, and lids ready to go before you start preparing your food. There are also times when your food will take quite awhile to prepare. For these times you can start your food preparation first and then get your jars, canner, and lids ready when your food is getting close to the point of filling your jars.
Since it doesn't take long to prepare simmering water, I have placed the food preparation part of the tutorial after the preparation of the jars and canner. As I mentioned, it might seem tempting to skip some of these steps, but I encourage you to go through each one pretending with me that you are preparing and canning some type of food. It will really help you understand the canning process fully and start a rhythm to your canning.
Since it doesn't take long to prepare simmering water, I have placed the food preparation part of the tutorial after the preparation of the jars and canner. As I mentioned, it might seem tempting to skip some of these steps, but I encourage you to go through each one pretending with me that you are preparing and canning some type of food. It will really help you understand the canning process fully and start a rhythm to your canning.

When your water reaches a simmer, you can turn your heat off, let your water cool just a tad if you would like, and then prepare to fill your jars.
 Fill your heated jars one at a time. If they were being kept warm in your canner, dump the heated water out and fill them with your "food" water to the
appropriate head space, as called for in your canning recipe. (Even if it seems like a silly step to replace heating water with "food" water, it is important to get into a canning rhythm.)
Fill your heated jars one at a time. If they were being kept warm in your canner, dump the heated water out and fill them with your "food" water to the
appropriate head space, as called for in your canning recipe. (Even if it seems like a silly step to replace heating water with "food" water, it is important to get into a canning rhythm.) Sometimes food can be pushed out of your jars from over pressuring during the canning process, effecting the seal due to improper head space or food stuck between the jar and the lid. To check for this when canning with water, add a drop of food coloring to each jar.
You may want to experiment with different head spaces. If you do this in the same trial run, use different food colorings. I'm using red for 1 inch head space and blue for 1/2 inch.
If you are canning anything that has solid particles in it, you will want to run a spatula around the outside of your jar to release any air bubbles within the jar. We'll pretend this jar has some garden vegetables in it. :)

 After your jars are filled, you will want to clean the rim of the jar
with a damp cloth to remove any residues that might prevent a sure
seal.
After your jars are filled, you will want to clean the rim of the jar
with a damp cloth to remove any residues that might prevent a sure
seal. Now remove a lid and ring from your heated water. A magnetic lid
lifter is very handy, but a couple of forks can do the job too.
Now remove a lid and ring from your heated water. A magnetic lid
lifter is very handy, but a couple of forks can do the job too.
Place the lid on your jar and screw the ring onto your jar. You will want to get it "finger tight", meaning tighten down with your fingers but not with all of your muscle. You want a tight seal, but you don't want to push all of the sealant out of the way. (If you have young ones helping, you might want to give it a quick tightness check before it goes into the canner.)
 Using your jar lifter, move your jars into the canner of heated water one at a time as you fill them, being careful to grab the jars around the neck of the jar below the glass ring.
 Once your canner is full, add a splash of vinegar, or about 2 tablespoons worth. This will keep your jars sparkly clear by preventing mineral deposits from forming on the outside of your jars. If you need to add additional water due to evaporation, go ahead and do that now too.
Getting Your Canner Up to Pressure
Before you start up your canner, you will want to make sure that your room is free of drafts and temperature fluctuations, as this can cause fluctuations as you work to regulate the temperature and pressure inside your canner. Check to see that ceiling fans are turned off and windows and outside doors are shut. Before you place the lid on your canner, always make sure to hold your lid up to some light, peek through the steam vent, and make sure the vent is clear of any debris.
It's now time to turn your burner on high and put on your canner's lid.
 When your lid is properly in place, the safety spring on your lid should be positioned above the recess in your canner's handle.
 Once you turn on your stove, watch for the first bit of steam to come out of the vent on the lid. When your canner starts releasing steam, set your timer for 10 minutes. This time frame is very important as your canner is pushing out any air and is filling with steam, which is what helps your canner reach the needed temperature to kill bacteria.
If you read my first post on Beginning Pressure Canning, you will probably remember to not let your canner steam much past these 10 minutes.
 When your 10 minutes is up, it is time to put the weighted pressure gauge on your canner. Be sure to check your recipe to make sure you have your gauge set for the proper amount of pressure.
 Continue heating your pressure canner on high until your pressure gauge shows that your canner is under pressure, wiggling, rocking, or moving as will be described in your canner's instructions. This should happen within 2-10 minutes.
 Once your gauge reacts to the pressure inside, your pressure canner is under the proper amount of pressure, and your safety spring should be securely dropped in your canner's handle.
Your Canner Under Pressure
 Once your canner is under pressure, you will want to begin your timer. You may start your timer at the first movement of your pressure gauge. Always double check with your recipe to make sure you have the correct amount of time for the food being canned and for the size of jars being used. Different foods have different
 densities and properties to them. The amount of pressure and time processing is crucial in ensuring that the contents of the jar are heated throughout the whole jar to a temperature that will destroy harmful bacteria.
Also, once your pressure canner is under pressure, you will need to adjust your temperature to the point where your canner is not over pressurized but where pressure is maintained. This is the part of the process that will take some getting used to, and it is the part of the process that was the most frustrating for me as I tried to preserve actual food and learn at the same time. Thus, the canning water.
If your pressure is too high, demonstrated by an overactive pressure gauge, gradually turn your temperature down. If your pressure is too low, demonstrated by a pressure gauge that ceases to react, bring your canner back to pressure, start your time over, and try again. Restarting your time when pressure is lost is required when canning food to ensure your food has been heated under the proper amount of pressure for the proper amount of time.
If you are using a gas stove, your pressure canner should respond fairly quickly to the gradual decrease in heat. If you are using an electric stove, your canner will take just a bit of time to respond making it extra important that you are right there and ready to start gradually turning down your heat when your canner comes under pressure. It is also tempting to overcompensate as you wait for your canner to respond, which could start a back and forth battle of increasing and decreasing your heat. This is where I went wrong when I started and why I ended up with a wildly hissing and trembling pressure gauge that was near impossible to regulate.
You don't have to worry about spoiling your food so take your time and find that right setting. Your goal is to find a setting on your stove which maintains pressure without needing to continuously adjust your temperature, as this could lead to liquids being pushed out of your jars - leading to seal failure. (If you have been working with your canner for an extended amount of time and feel that you might have steamed all of the water out, depressurize your canner, replenish your water, and try again.)
Although my camera leaves much to be desired for video, here is how my pressure canner acts when regulated: You should hear a rolling boil inside the canner and my pressure gauge will react at least a few times every minute - sometimes jiggling, sometimes just rotating, but having some type of motion as extra pressure is released.
Learning your pressure canner is kind of like riding a bike. It takes awhile to find that balance, but once you do you are off and running! Take your time, learn your stove and canner, and don't worry about spoiling any food. It's just colored water. :)
Depressurizing Your Canner
After you have maintained pressure for the amount of time called for, it is time to depressurize your canner.
If you have a gas stove, you can just turn your heat off. If you have an electric stove, you can turn you heat off and gently lift (not slide) your canner off of the burner, being careful not to tip or drop your canner or you can just turn your heat off and leave your canner where it sits, which will just add a bit of time to depressurizing your canner.
When you see the lid's safety spring has lifted, your canner is no longer under pressure, and you can remove the weighted gauge.
If you are thinking your canner is no longer under pressure but the spring is still engaged, you may need to tap the lid's handle to get your safety spring to lift.

Once you have confirmed your canner is no longer under pressure, wait 10 minutes before removing your canner's lid. This extra time of slowly cooling down your jars will help ensure that your seals achieve a tight seal. You may even start to hear some pings of lids being sealed as the button is pulled down.
After Processing
Using your jar lifter, carefully lift your jars out of your canner, being careful not to tip them. I like to use a potholder underneath my jars as well at this point since the contents of the jar are extremely hot and will continue to boil inside the jar even after being removed from the canner.
When you do this, check the water in your canner to see if any of the colored liquid was drawn out of the jars. If so, try another trial run sometime and watch for over pressurizing of your canner.

Place your jars on a insulated surface, such as a towel, with a spacing of an inch between each jar, allowing the jars to cool.
During this time, the contents of the jar will contract due to cooling (remember taking balloons outside in the winter?) With the seal that is formed with the lid, no additional air will be allowed inside the jar, and a vacuum will be formed, holding the lid onto the jar.
It is important to not disturb the ring and the lid as the jars are cooling as this could damage the seal of the jar.
Checking Your Seals
When your jars are fully cooled, it is time to check the seals of your jars.
First, check the buttons in the center of your lids. If any of the buttons on your lids are not pulled down, you did not achieve a seal with that jar. If the buttons are pulled down but springy, your seal may not last long term. You can move on to the next step with those jars or set them aside or in the fridge to be used in the near future, making sure to test check the seal again before eating. (I usually put an x on these lids so I will be sure to carefully check them.)
 Next, unscrew the lids that have a tight vacuum and have pulled the button firmly down. Carefully hold on to the edge of the lid and gently lift up, having your extra hand ready to grab the jar. Jars with a tight seal will be able to be lifted completely off the counter by just holding onto the metal lid. Jars that do not have a tight seal will become unsealed.
Any jars that are not sealed will need to be reprocessed within 24 hours,
stored in the refrigerator to eat within the next few days, or frozen.
Storing Your Jars
 All jars that remain sealed are ready to be stored. Before storing, however, you will first want to wash the outside of your jars, especially if you had seepage within your canner. Pay close attention to get the top of the jar clean, where the lid screws on. You will not need to replace the screw on lid either to store your jars, as it might rust on if any bit of moisture left on the jar or in the air stays underneath.
  Using a permanent marker, mark your lids to show the contents of your jar and the date processed. Not only do I like to make little notes on my lids to recall special memories made while canning that particular batch, but I also like to use different colored markers to differentiate between different batches of the same food.
  The best place to store your jars, keeping your food at a high quality, is in a cool, dry, and dark place. Although, these jars you might want to just set out on the counter so you can admire your new skill for awhile!
Opening Your Jars
 It is important to always get in the habit of rechecking
the seal on your jar before opening it up. The lid should still be tight against the jar, with the
button pulled down. When slowly opening the lid, you should be able to hear the air rushing into the jar.
Pay extra close attention to any lids that might have been marked with a
weak seal. If you can hear the air as you open the jar, they are just
fine.
It is important to always get in the habit of rechecking
the seal on your jar before opening it up. The lid should still be tight against the jar, with the
button pulled down. When slowly opening the lid, you should be able to hear the air rushing into the jar.
Pay extra close attention to any lids that might have been marked with a
weak seal. If you can hear the air as you open the jar, they are just
fine.
There will be times where you will know for sure if a jar has had a seal failure during storage. There may also be times when you open the lid that you aren't quite sure about the seal, especially on a jar that was marked with a weak seal. When working with canning, or any type of food really, remember the saying "If in doubt, throw it out."
It is sad and a bit painful to toss food that you have worked so hard to preserve, but it is much more important to be safe then to risk illness. Just dispose of the food in a manner that no other person or animal will get into it, carefully wash your hands and items that the food might have touched, sterilize your jar in your dishwasher or a 10 minute boiling water bath, and celebrate the benefits of all of the other jars that have stayed sealed and that you have enjoyed.
Now What Do I Do?
If you have read about Understanding Pressure Canning and have all of your materials together, here are some next steps you can take:
- Go ahead and do some trial runs with colored water in your pressure canner. Try your trial runs with different numbers of jars and different sizes of jars. And while you are at it, think of someone who you can bring along beside you as you learn. (If you are working with a youngster, there are many things they can do, but do be cautious when the canner is under pressure and when you are working with hot food and jars.)
- Make notes on how your canner runs, as well as the time frames to reach certain points. Keep in mind that the number and size of jars, the density of what you are canning, and outside factors such as the temperature of your house will all effect these times. Even so, you will start to learn what to expect from your canner.
- Begin thinking about and preparing a spot for your filled jars to be stored. This might mean emptying a shelf in your kitchen cabinet or constructing some shelving elsewhere in your house, as I am now needing to do!
- Look forward to Part 3! In this post I will share about ways to fill your pantry with food you have preserved, even during the winter months or when you don't have a garden available.
Tools of My Trade
You can check out the aff links below to learn more about these canning tools, and you can also read about them in the first post of my series, Understanding Pressure Canning, where I talk about how to pick out and find good used equipment.shared with My Humble Kitchen, Natural Living Monday, Homemade Mondays, Making a Home, Real Food Friday, The Backyard Farming Connection, Frugally Sustainable, Not Just a Housewife, Ducks in a Row, Tilly's Nest, All Things With Purpose, A Life in Balance, Living Well Spending Less, Serving Joyfully, Pioneer Mamma, Simple Life Sunday, Simply Natural Saturdays, Dandelion House, Love Bakes Good Cakes, Growing Home
4 comments:
Thanks for this great and thorough tutorial! I am moving to a farm at the end of the month and plan on doing a lot of canning this summer.
(P.s. Found you through the Real Food Fridays linkup.)
This is so smart. I started canning a few years ago and had I read this about canning water, I would have been really happy. I was so afraid of blowing up my pressure cooker or poisoning everyone with my canned goods! I use a pressure cooker but I am seriously considering getting a pressure canner since it will hold more at once and the directions I read are more for a pressure canner than a pressure cooker. I too have learned that a raging boil for the whole canning process is ridiculous and I've learned that wild steam blowing out the vent isn't really necessary.
I still worry every time I can anything that I will probably poison myself or anyone who eats it, but I love having that canned applesauce when there's nothing good available in the produce section!
What an awesome tutorial! When I first started canning I was convinced I would end up giving everyone botulism lol. I love that you practiced first with water. I wish I had done that!
Ashley @ PioneerMomma.com
Thank you for such a thorough post on pressure canning! (And your jars look beautiful!)
Post a Comment