
 Although it is the first of March, I'm having a hard time convincing myself that spring is coming. Last week temps were hovering around 0 degrees, with a low of -14 one day, and that without wind chill.
Even though spring seems ages away, my seedlings are telling me differently. Last week my tomato seedlings broke through the soil and are soaking in the sun from our South facing window. The first of my peppers are just starting to peek through too.
I have tried starting my seedlings many different ways over the years. Time, space, and lighting have always been a challenge to work with, which has led me to trying so many different methods.
I think the first year I tried starting my seeds, I just cut off the bottoms of 4 or so milk jugs, filled them with soil, and planted my seeds. It wasn't beautiful, but it worked for the few seeds that I wanted to start.
 The following year, Ethan bought me a seed starting tray with the expanding soil discs. These were great to use, and the following year I went this route as well. The only difference was that being my frugal self, I didn't want to buy replacement discs. Instead, I made my own planting pots out of newspaper and potting soil, detailed in this post that I put together.
I used this method for another year or two, but soon I was wanting to start more plants than I had room for with trays. I was also needing to spend a considerable amount of time making my homemade planting pots for all of the additional seeds I wanted to start.

I ended up planting them quite close together due to the amount of space I had to work with and seeds I wanted to start. I planted 2 seeds every inch or so, planning to pinch off the weakest of the two once they got growing. To separate my varieties of plants, I stretched a length of yarn between each row, using a toothpick to hold it in place at each end.
This worked well enough for me last year that I decided to go this route again this year.
As I did last year, I have my seedlings by our south facing window. I am again using 2 grow lights that Ethan gifted me (he knows me, huh?!) to keep my plants from becoming spindly from trying to stretch towards more concentrated light. I also have a fan set on low to help develop strong stems on my seedlings, replicating a light breeze outside. In addition, I rotate my container daily so that different sides of the container are right next to the window.
 By planting my seedlings in a container like this, the evaporation of the soil is decreased considerably compared to the planting pots that dried out so quickly. I use my finger along the edge of the container to test the moisture level of the soil, being careful that it doesn't dry out or become too wet, which could lead to problems for the roots.
 I have switched from a clear container to a black container, hoping to absorb some of the sunlight and heat coming from the window to aid in germination and growth. I have marked my rows by writing on a spoon with permanent marker - which I am sure will be much more effective than the tags I taped on the side of the container last year (that would fall off). I have also planted my seeds in blocks instead of rows to make it easier to remove the seedlings that I am wanting to plant, even though I do plan on planting them all pretty much at the same time. (Last year, after I hardened off my plants outside, I used a gardening knife to cut through the soil and remove the plants as I was planting them. I didn't feel like I caused much root damage, even though the plants were so close together.)
We'll see how this second year of starting seeds this year goes. If it is like last year, I'm sure I will be quite pleased.
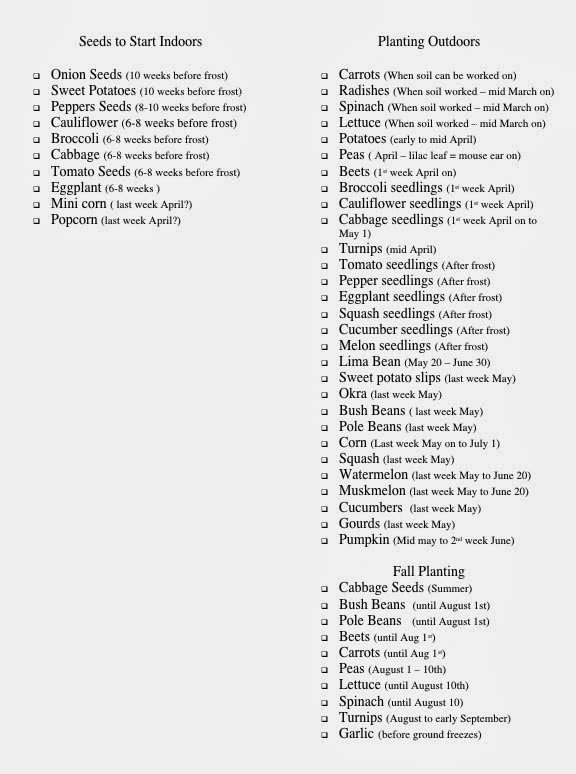
As I wait for spring to arrive, I will prepare a few more smaller tubs to plant in and finish organizing my heirloom seeds, according to the planting guide I put together last winter. I found this to be very helpful for me after years of fumbling through seed packets, trying to figure out when to plant what, and scratching my head in the garden trying to remember what I finally decided. I only wish I would have made one of these lists sooner! Feel free to copy it and print it out if you would like, remembering that the dates I have set are for planting times in southern Iowa.
If you are like me, you might be finally brushing off the tiredness from wrapping up the gardening and canning season of last year and feeling a bit of excitement about getting back in the garden this spring. After this long, cold winter, any thought of spring is exciting!
Follow The Beginning Farmer's Wife on Facebook for additional personal peeks at building a family farm.
Tools of My Trade
Here are a few of the supplies I use for starting my seeds. They can be found in most home and garden departments or through the affiliate links below.
1 comment:
I just moved to a farm, so this information is very helpful! I've been seeding all week. We've actually already been able to harvest lettuce from our aquaponics system.
Post a Comment